Tenants
A tenant is a client's Microsoft 365 organization. The Tenants page (SaaS > Tenants in the Slide Console) lists every tenant you've connected, along with its status and the client it belongs to. To connect a new tenant, click Protect New and follow the steps in Authorization.
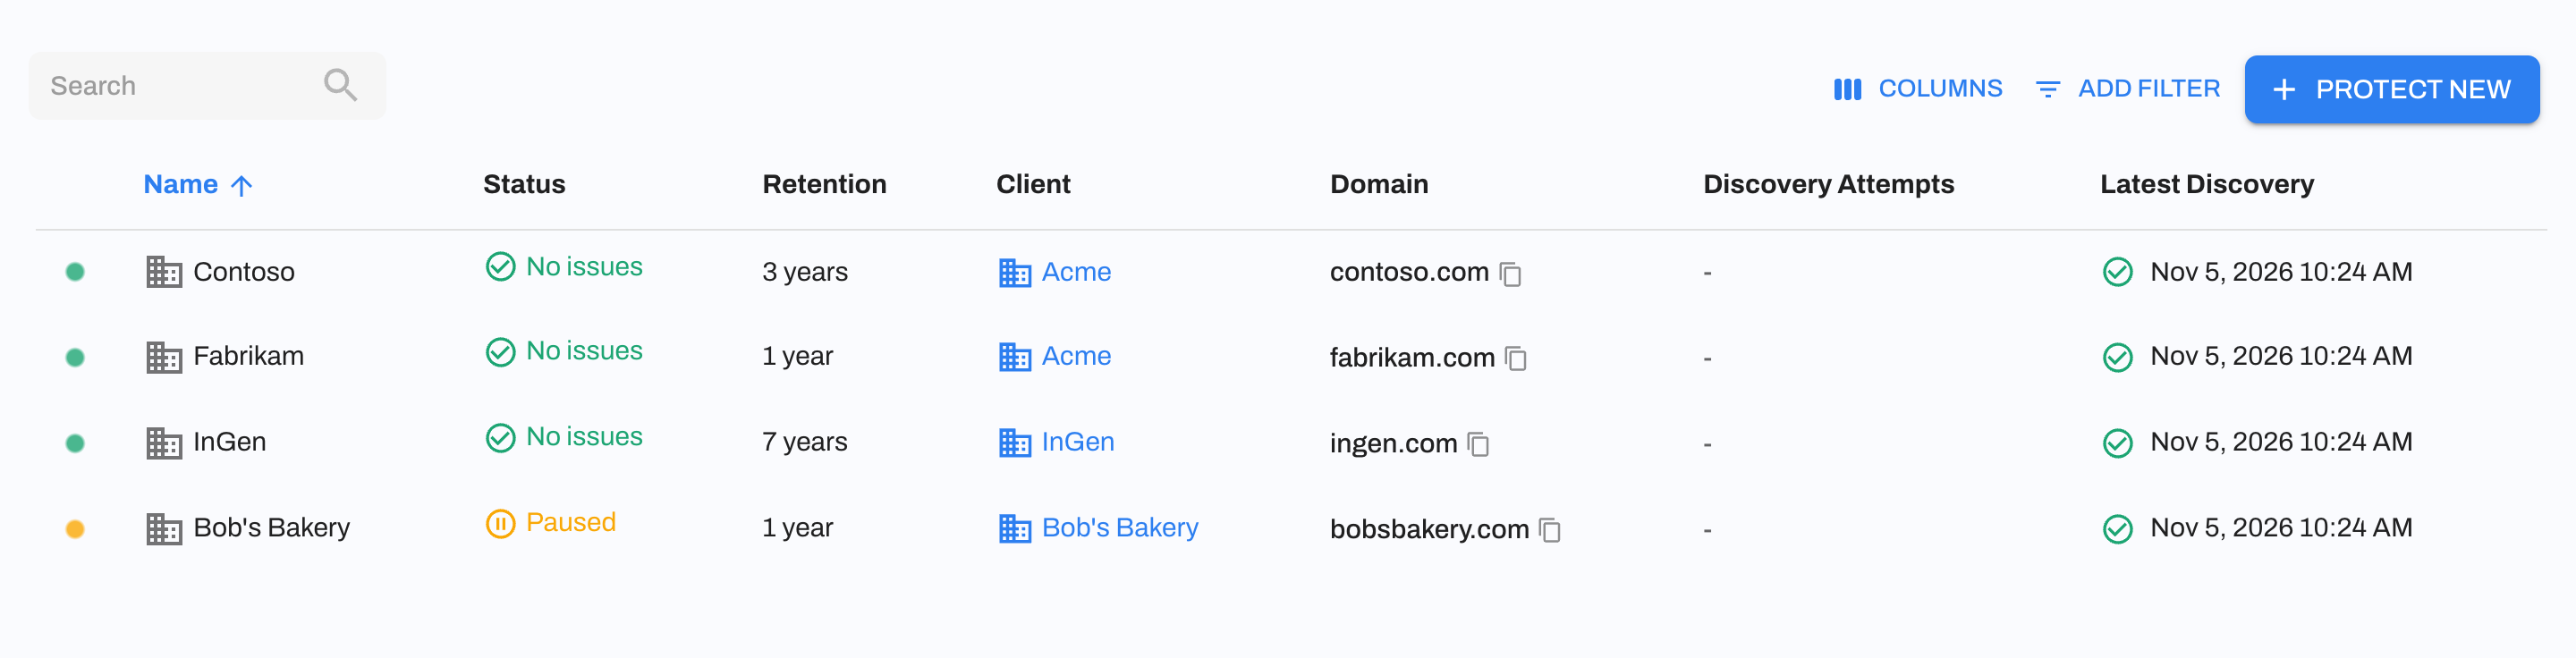
The tenants table has the following columns:
- Name: The tenant's display name. An "Action required" icon means the tenant needs your attention (e.g. it's pending setup or needs to be re-authorized).
- Status: The tenant's current status (see below).
- Client: The client the tenant belongs to.
- Domain: The tenant's primary domain.
- Platform: The SaaS platform. Currently always Microsoft 365. Hidden by default.
- Discovery Attempts: The results of the most recent discovery runs.
- Latest Discovery: When discovery last ran.
- Created At: When the tenant was added to Slide. Hidden by default.
You can filter the list by Status and Client, or search by name.
Tenant Statuses
- Pending Connection: The tenant was created, but nobody has signed in to Microsoft to grant access yet. Open it and click Continue to Microsoft.
- Pending Activation: Access was granted, but protection hasn't been activated. Open it and click Activate Protection.
- No issues: The tenant is connected and protected. This status doesn't show whether backups succeeded. To check backups, see the Status column on the Applications page.
- Paused: Backups and discovery are paused for the tenant.
- Needs Connection: Someone started re-authorizing the tenant but didn't finish. Re-authorizing clears the tenant's existing access, so backups don't run until it's finished. To finish, open the tenant and click Continue to Microsoft on its Overview tab. If Slide loses access some other way, the tenant's status doesn't change. Instead, its backups fail and its applications show Needs attention.
- Suspended: Protection for the tenant was suspended. Contact Slide support.
Tenant Details
Click a tenant to open its details. The Overview tab shows:
- Actions: Discover Now runs discovery right away. Protect All Resources protects every resource that isn't protected yet, as a one-time action. See Protect All Resources. Search Files opens the tenant in the Explorer.
- Discovery: When discovery last ran, whether it succeeded, and when it will run next.
- Tenant: The tenant's client, platform, domain, and ID.
- Data Protection: How the tenant's data is protected:
- Encryption: Slide-managed keys.
- Retention: The retention period chosen during setup.
- Region: Where the backup data is stored (US East).
- Schedule: The tenant's backup schedule.
- Recent resources: The most recently discovered users, shared mailboxes, and other resources. Click See all to view them on the Resources page.
- Recent Discovery Attempts: The results of recent discovery runs, including how many resources were created, updated, archived, or reactivated.
Protect All Resources
Protect All Resources protects every unprotected resource in the tenant in one step. In the dialog, choose which Resource types to protect (e.g. User or Shared Mailbox). By default, paused resources are left alone. Enable Resume paused resources and applications to resume them as well.
This is a one-time action. It only protects resources that have already been discovered, and it doesn't turn on Auto-Protect. Resources discovered later are only protected automatically if Auto-Protect is on.
This is useful if you turned off Auto-Protect during setup and later decide to protect everything. To also protect new resources as they're discovered, turn on Auto-Protect in the tenant's Settings tab.
Tenant Settings
The Settings tab lets you change the following:
- Display Name: The name Slide uses for this tenant.
- Client: The client this tenant belongs to.
- Auto Protect: See Auto-Protect.
- Pause/Resume Protection: See Pause.
- Schedule Backups: The default backup schedule for the tenant. See Schedule Backups.
- Tenant Passphrase: Backups for every tenant are encrypted with an encryption key unique to the tenant and managed by Slide. There's nothing for you to set or store. This is different from the encryption passphrases you can manage for Slide BCDR.
- Re-Authorize: Reconnects the tenant to Microsoft 365. See Re-Authorizing a Tenant.
- Delete Tenant: See Deleting a Tenant.
The retention period and data location are set during setup. Neither can be changed in the Slide Console. To change the retention period, contact Slide support.
Auto-Protect
When Auto-Protect is enabled, Slide automatically protects every new resource it finds during discovery, such as a new employee's mailbox or a new shared mailbox. New resources are backed up on the tenant's schedule.
Auto-Protect never protects a resource again after you remove its protection. To protect it again, protect it on the Resources page.
Turning Auto-Protect on only affects resources discovered from then on. It doesn't protect resources that were already discovered and left unprotected. Use Protect All Resources for those.
If you change this setting while discovery is running, the change applies on the next discovery run.
Pause
You can pause protection for a tenant for a set amount of time (e.g. during a migration). While a tenant is paused, Slide doesn't run backups or discovery for the tenant or any of its resources. Existing recovery points are kept and can still be restored.
To pause, open the tenant, go to the Settings tab, and pick a duration under Pause/Resume Protection. To resume early, choose Resume backups now, or click Resume Protection on the Overview tab.
You can also pause individual resources and applications.
Your Own Organization
You can protect your own organization's Microsoft 365 tenant with SaaS Backup, too. When you check This is our own organization during setup (or Mark as Own Organization on the client), the tenant's data is restricted to your Account Owner and Account Admin users. That way, technicians can't browse their colleagues' or management's mailboxes.
- The tenant's status is visible to everyone in the tenant list.
- Its resources, applications, and Explorer are visible to Account Owners and Account Admins only.
- Users with other roles see the tenant dimmed and can't open it.
See Users for more about roles.
Deleting a Tenant
To delete a tenant, open it, go to the Settings tab, and click Delete Tenant. You'll need to type DELETE to confirm.
Warning
Deleting a tenant removes all data associated with it, including all backups, recovery points, and protected resources. This cannot be undone.
Deleting a tenant in Slide doesn't change anything in Microsoft 365. If you also want to remove Slide's access, delete the Slide Backup apps from the tenant in the Microsoft Entra admin center.
Activity Logs
Changes to tenants appear in your activity logs, including when a tenant is created, updated, activated, or deleted.