BMR with Slide
Slide BMR is the recommended way to perform a Bare Metal Restore. It runs from a bootable USB drive and restores a snapshot from an on-site Slide Box or the Slide Cloud.
The workflow is designed for MSP technicians: select the protected system and snapshot, map its disks to the replacement hardware, review the plan, and let Slide transfer and verify the restored data.
Danger
Slide BMR permanently erases every destination disk selected for restore. Read the Review page carefully before starting.
What you need
Before starting, have the following ready:
- the destination computer, with one destination disk for each protected disk you plan to restore;
- a USB drive for the Slide BMR recovery media;
- a technician computer on the same network as the destination;
- a Slide API token with access to the protected system;
- the agent passphrase, if the protected system uses a user-managed passphrase; and
- storage and network drivers from the destination hardware vendor, if Windows may not include them.
For the most predictable restore, use destination disks that are the same size as or larger than their source disks. If a destination is smaller, Slide BMR will offer an analysis only when the disk layout may be safely adjusted.
Keep the original protected system shut down throughout the recovery. The restored and original systems must not be online together.
1. Create the Slide BMR USB drive
Download the latest Slide BMR ISO, then use the instructions for your computer's operating system.
Warning
Writing the ISO erases the selected USB drive. Confirm that you selected the correct removable drive.
Windows
- Download and open Rufus.
- Under Device, select the USB drive.
- Under Boot selection, select the Slide BMR ISO.
- Select Start. If prompted, choose DD/Image mode.
- Safely eject the USB drive when writing is complete.
Linux
Open a terminal in the folder containing the ISO. Use lsblk to identify the USB drive, then write the image with dd:
Replace /dev/sdX with the USB drive. Use the whole device, not a partition such as /dev/sdX1. When the command finishes, safely eject the USB drive.
macOS
Open Terminal in the folder containing the ISO. Use diskutil list to identify the USB drive, then unmount and write it:
diskutil list
diskutil unmountDisk /dev/diskN
sudo dd if=slide-bmr.iso of=/dev/rdiskN bs=16m
diskutil eject /dev/diskN
Replace diskN with the USB drive's identifier. Use the whole disk, not a partition such as diskN1.
Do not extract the ISO or copy it onto a normally formatted USB drive. The ISO must be written as a disk image.
Slide BMR supports 64-bit Intel and AMD systems. It can boot in UEFI or legacy BIOS mode. The destination should use the same firmware mode as the protected system; Slide BMR displays the protected system's mode before the restore starts.
2. Boot the destination and connect remotely
- Connect the destination to a reliable network. Wired DHCP is automatic when available.
- Insert the Slide BMR USB drive and boot the destination from it.
- Wait for the recovery screen to display an HTTPS address, QR code, pairing PIN, and certificate fingerprint.
- From a technician computer on the same network, scan the QR code or open the displayed address.
- Your browser may warn that the certificate is not trusted. This is expected because Slide BMR creates a temporary certificate for each boot. Compare the certificate fingerprint with the one on the destination before proceeding.
- Enter the six-digit pairing PIN.
Once paired, the browser becomes the active remote console and the display attached to the destination changes to status-only mode. Use one console at a time so two technicians do not make conflicting selections.
If the destination needs Wi-Fi or a static IP address, select Network before continuing.
3. Connect to Slide
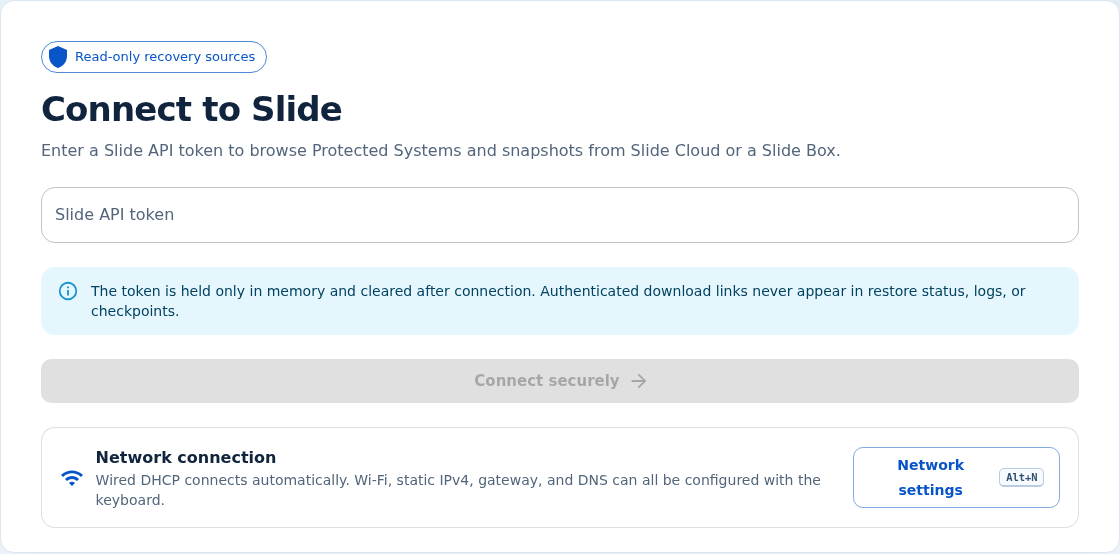
- Enter your Slide API token.
- Select Connect securely.
The token is held in memory for the recovery session. Do not share it in a ticket, chat, or screenshot. You can create and revoke tokens from My Settings > API in the Slide Console.
4. Choose the snapshot
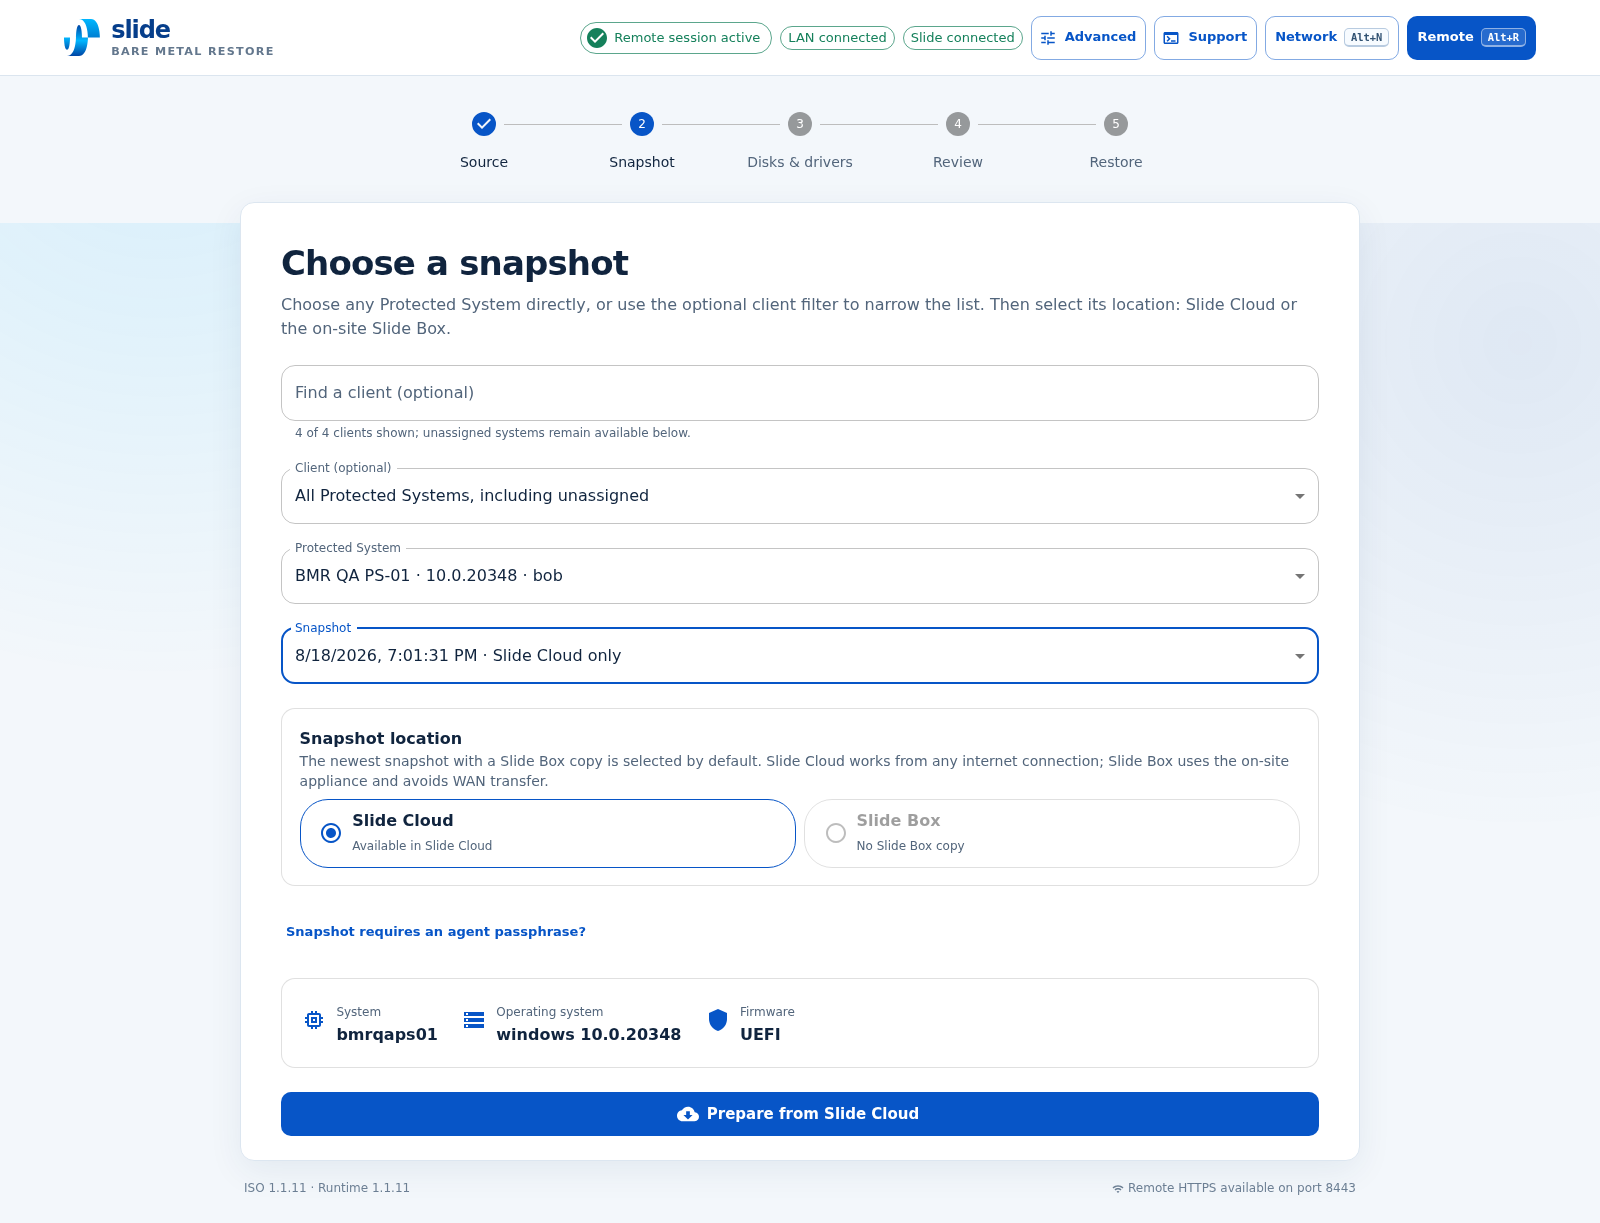
- Use Client (optional) to narrow the list if needed.
- Select the correct Protected System.
- Select the Snapshot you want to restore. Confirm the date, time, and available locations.
- Choose the snapshot location:
- Slide Box uses the on-site copy and normally avoids downloading the backup data over the internet.
- Slide Cloud can be used from any location with a suitable internet connection.
- Select Prepare from Slide Box or Prepare from Slide Cloud.
If the snapshot uses a user-managed agent passphrase, Slide BMR will ask for it. Have the client enter the passphrase directly whenever possible.
Preparing the image can take several minutes. You may refresh or reconnect the remote browser without stopping preparation.
5. Map the disks
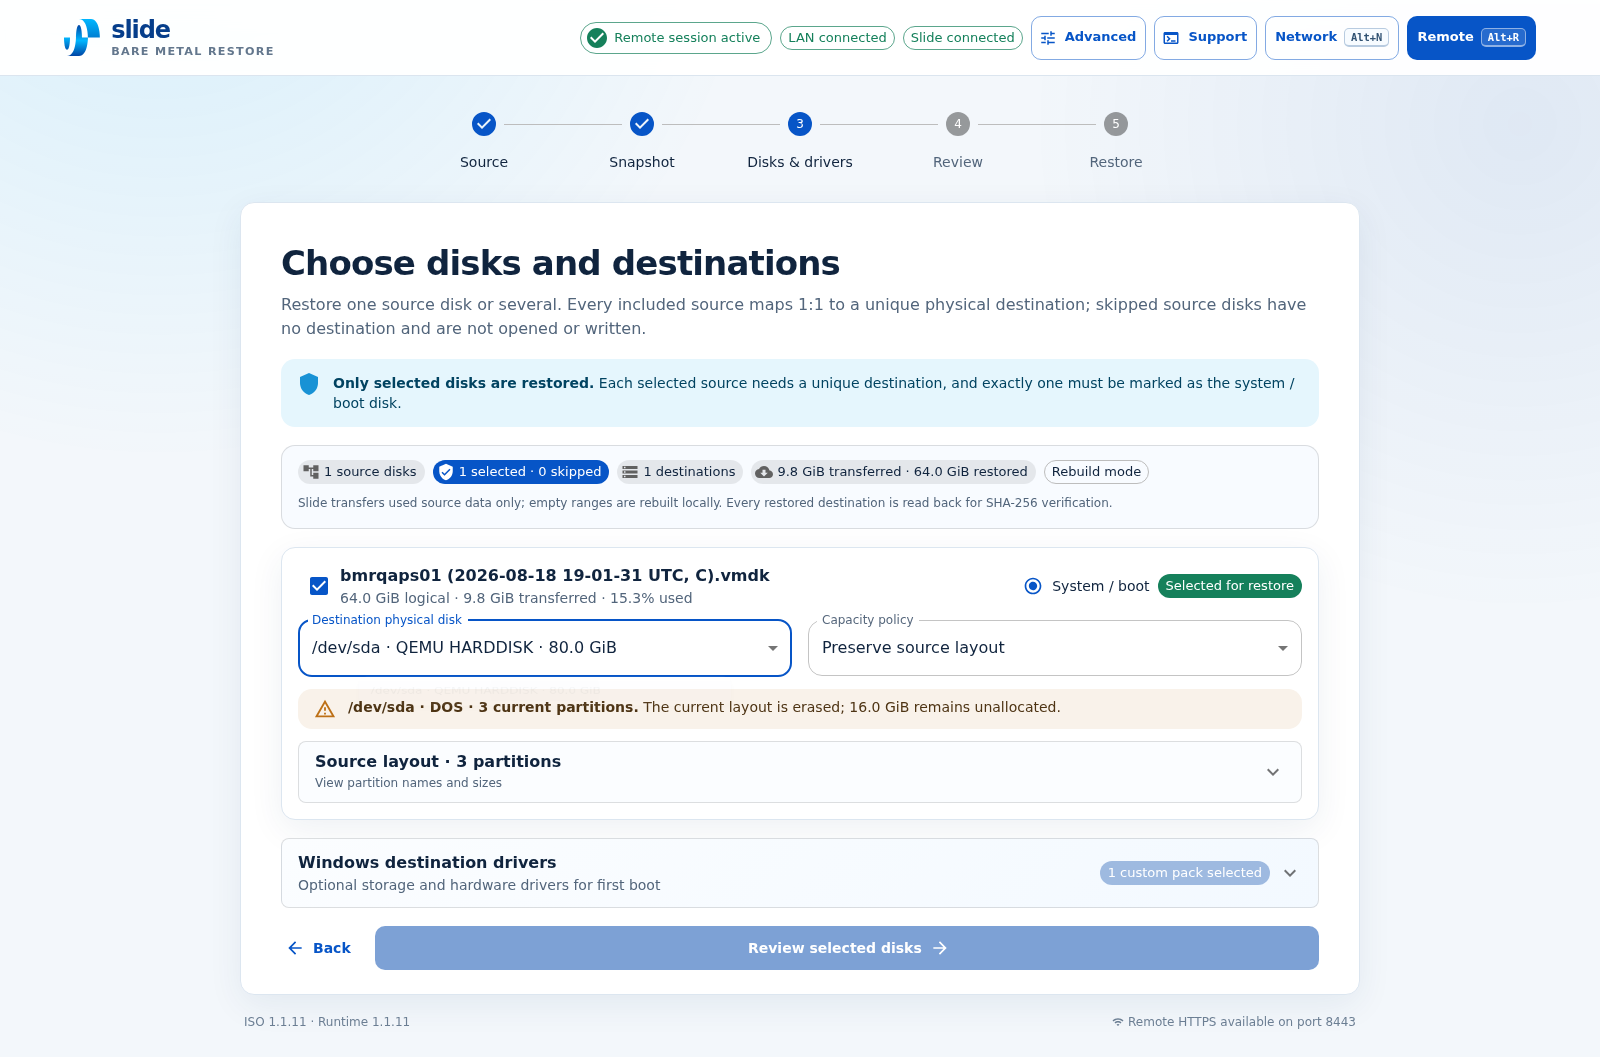
On Choose disks and destinations:
- Keep the checkbox selected for each source disk you want to restore.
- Clear the checkbox for any data disk you intentionally do not want to recover.
- Mark exactly one selected source disk as System / boot.
- Map each selected source disk to the correct Destination physical disk.
- Under Capacity policy, leave Preserve source layout selected unless you specifically want to use additional capacity and that option is available.
Check the destination disk model and capacity carefully. Slide BMR only writes to disks selected on this page, but every selected disk will be erased.
For a Windows restore to different hardware, add the destination vendor's extracted driver ZIP if needed.
6. Review and start the restore
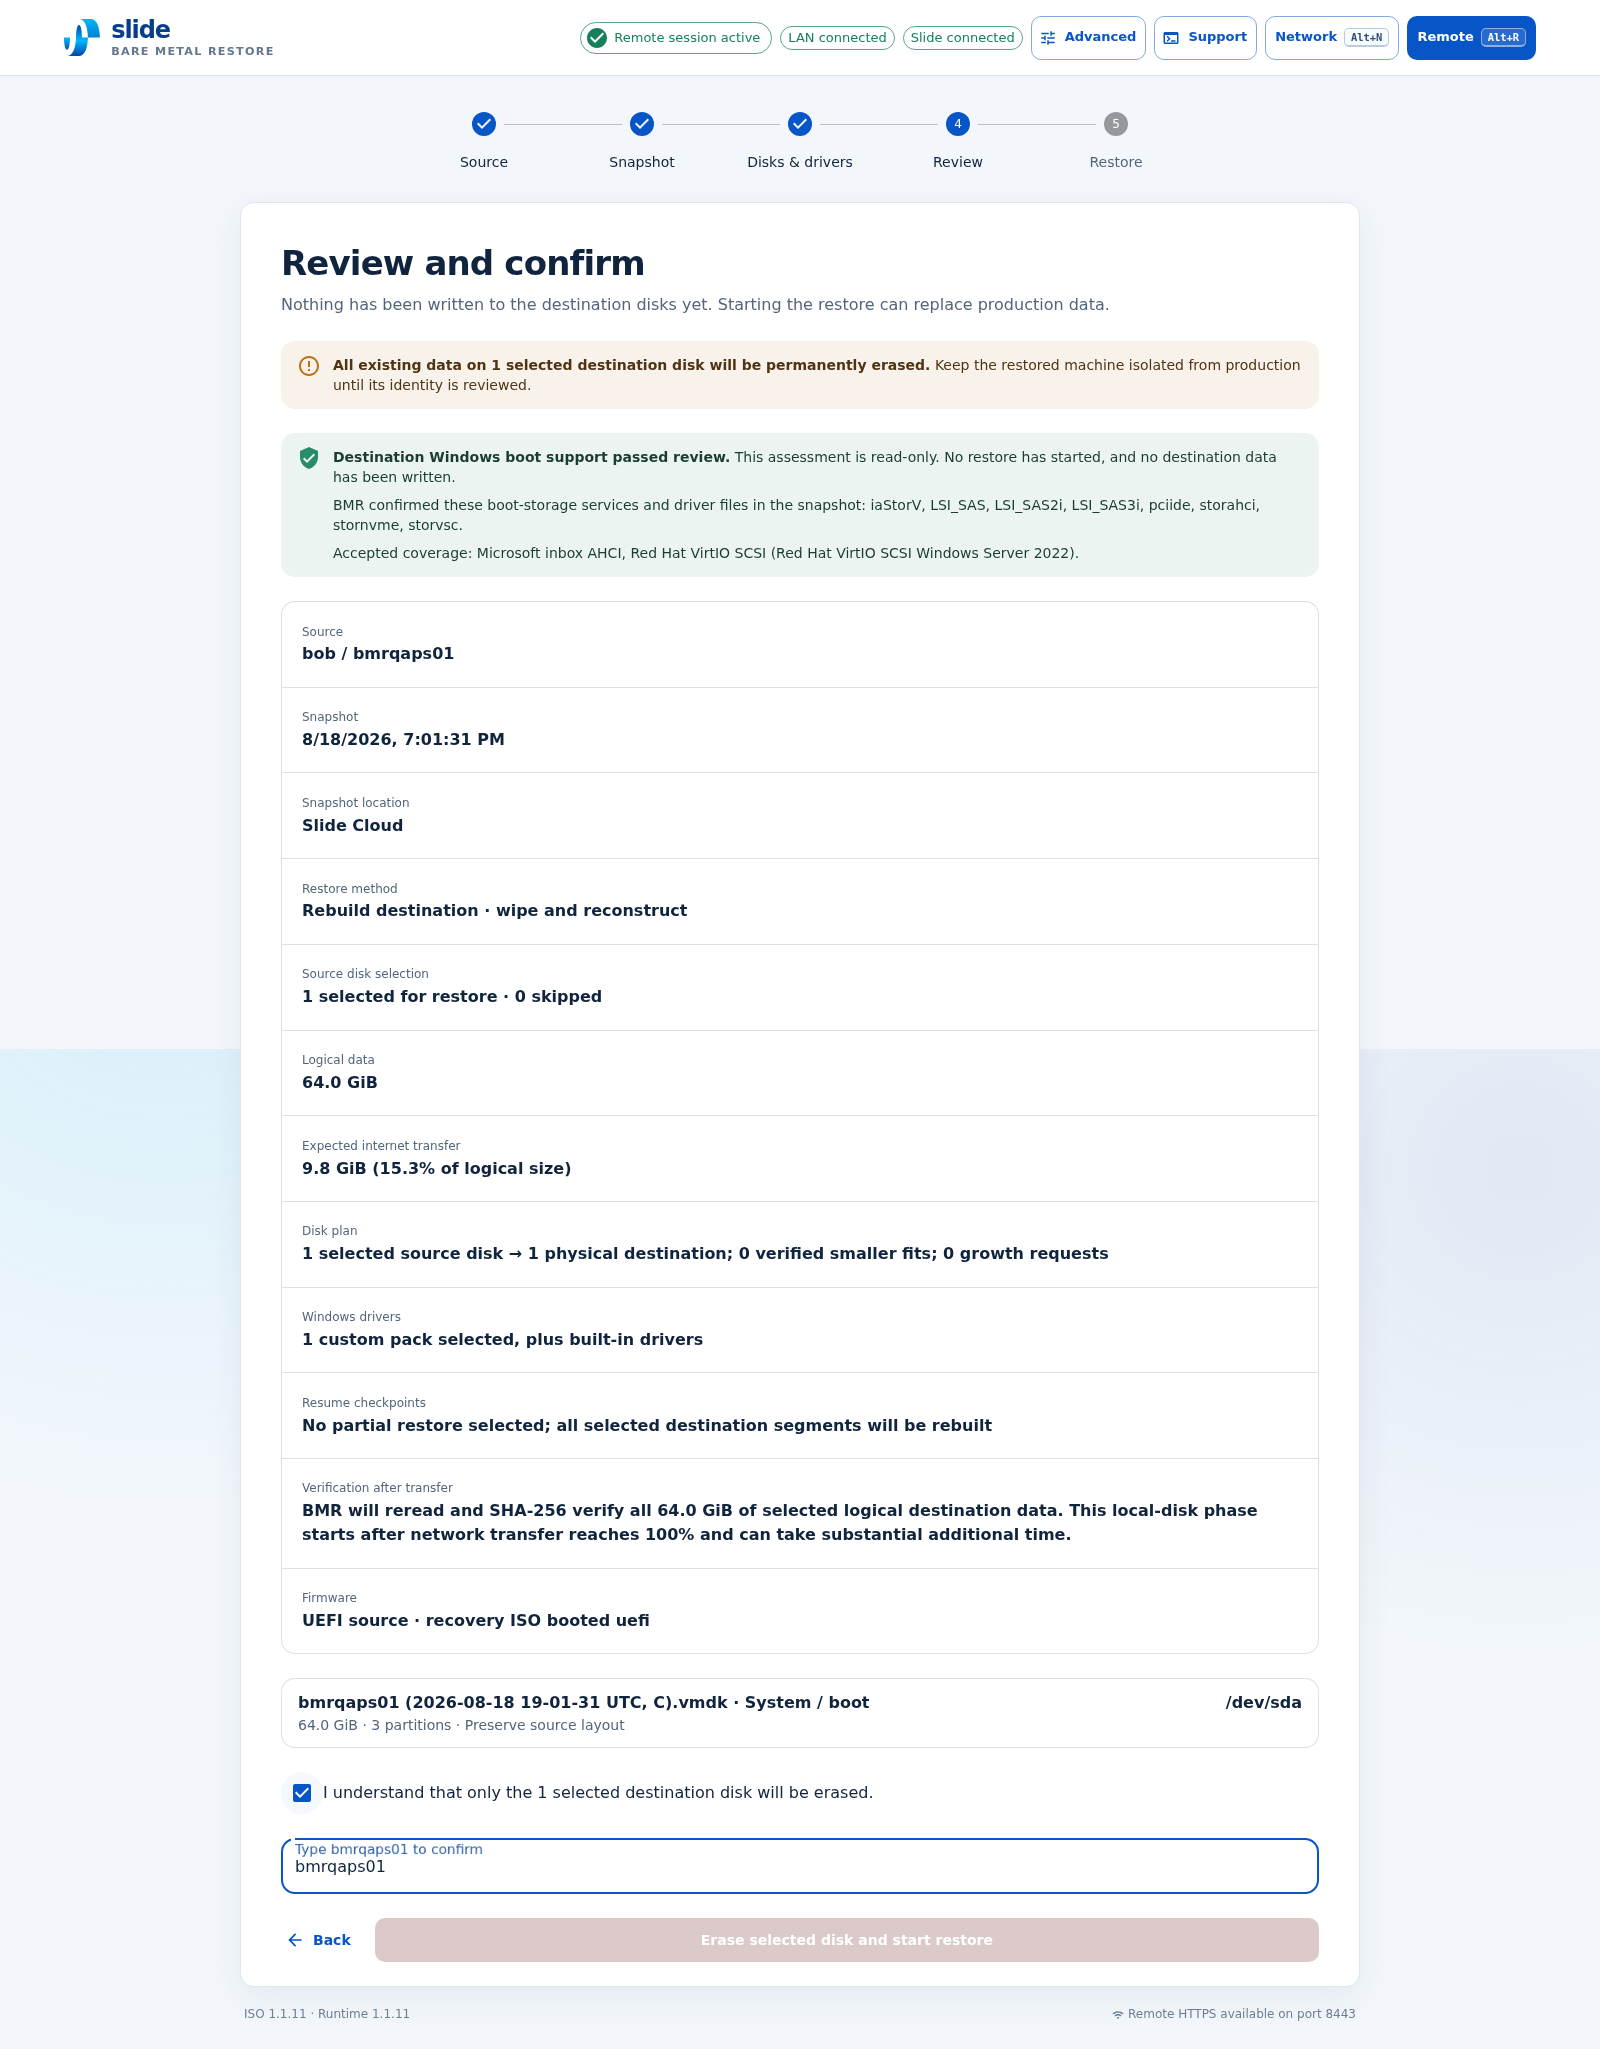
The Review page is the last read-only step. Confirm:
- the protected system and snapshot;
- whether the snapshot location is the Slide Box or Slide Cloud;
- every source-to-destination disk mapping;
- the number of disks that will be erased;
- the source and destination firmware modes.
If everything is correct, select the acknowledgement, type the protected system's hostname, and select Erase selected disk and start restore.
Do not continue past an unrecognized disk or incorrect snapshot. Correct the selection or contact Support first.
7. Monitor the restore
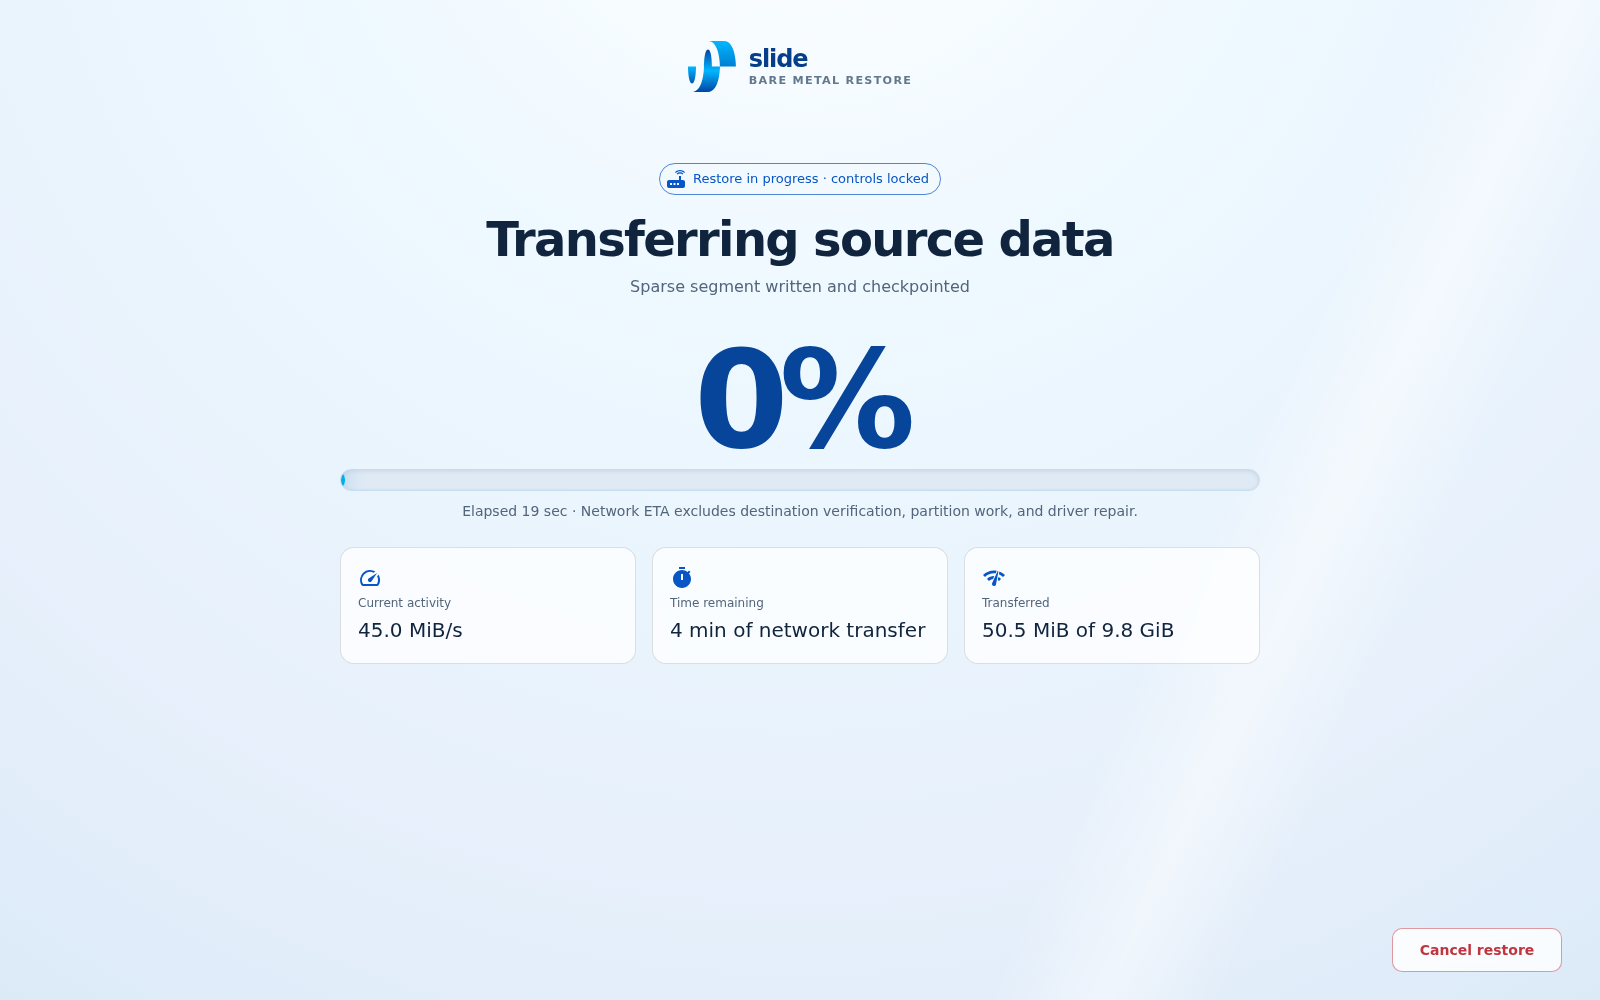
Slide BMR transfers the recovery image, verifies the restored data, and prepares the operating system to boot on the destination hardware. The verification and boot-preparation stages continue after the network transfer reaches 100%, so allow additional time.
Keep the destination powered on, leave the USB drive connected, and keep the recovery source reachable. If the remote browser disconnects, reconnect to the displayed address; the restore continues independently of the browser.
8. Shut down and test the restored system
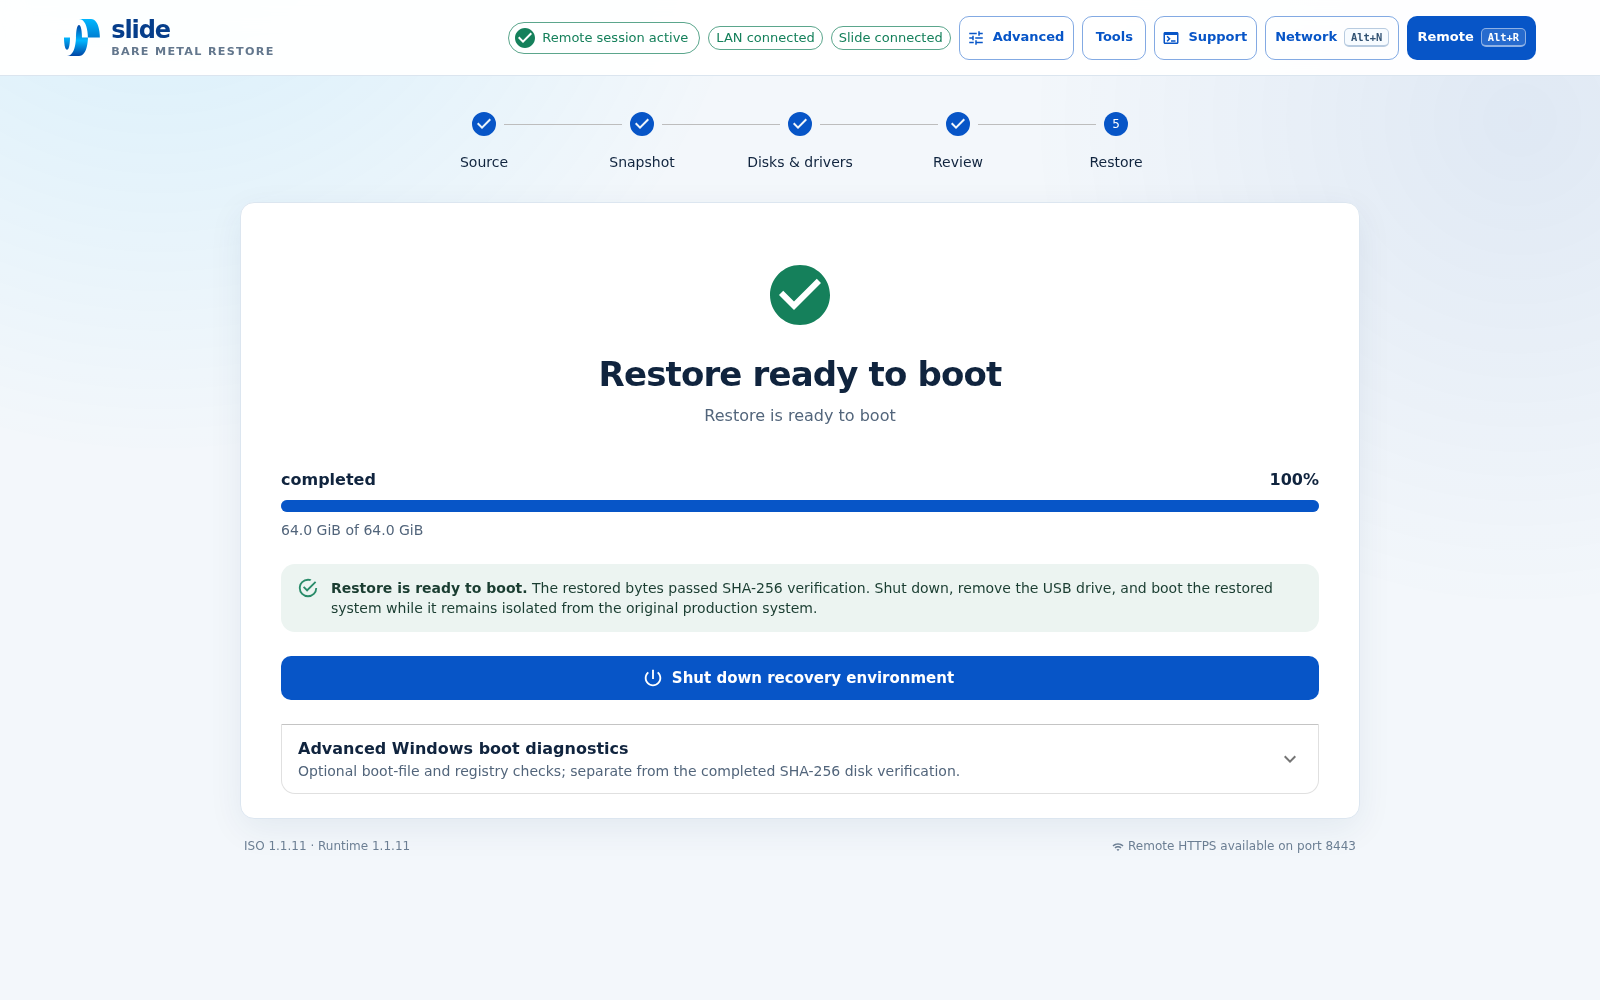
Wait for Restore ready to boot. Then:
- Select Shut down recovery environment.
- Wait for the destination to power off.
- Remove the Slide BMR USB drive.
- Leave the destination isolated from the production network and boot it from the restored disk.
- Confirm that the operating system starts and that you can sign in.
- Review the hostname, IP configuration, applications, and services before reconnecting production traffic.
- Confirm the Slide Agent reconnects and that scheduled backups resume.
Do not start the original protected system while the restored system is online. Duplicate system identities can cause network, domain, application, and backup conflicts.
If Slide BMR stops with an error, record the message shown on screen and contact Slide Support. Do not boot a partially restored destination.