Restores
After you have successfully backed up a protected system, you can initiate a restore from the Restores page. Slide offers several restore options, including virtualization, file restore, and image export. Other restore options will be added in the future.
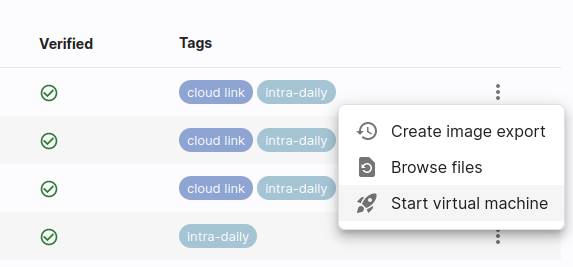
You can create a restore from the big blue "Create Restore" button or via the Snapshots page. Depending on the type of restore, a different dialog will walk you through the necessary steps.

Virtualization
A virtualization lets you instantly boot a backup as a virtual machine, either on your local Slide Box or in the Slide Cloud. This is incredibly useful for instantly getting the protected system back up and running in the event of a disaster or for testing purposes.
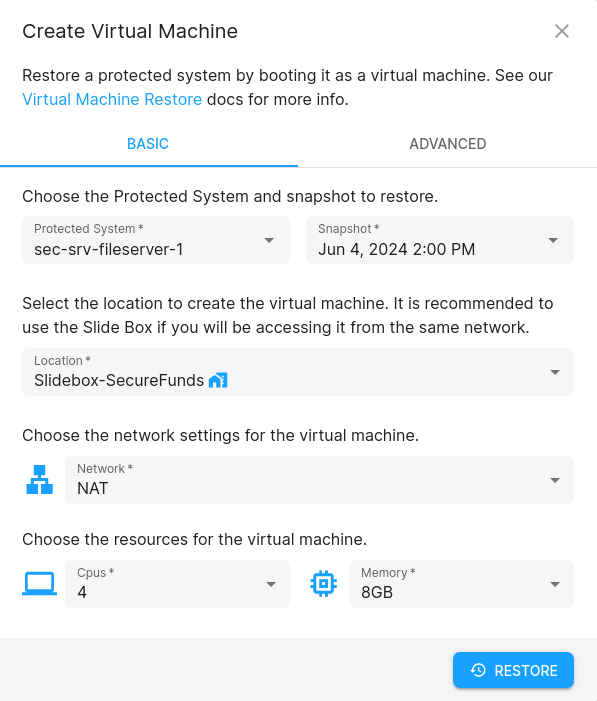
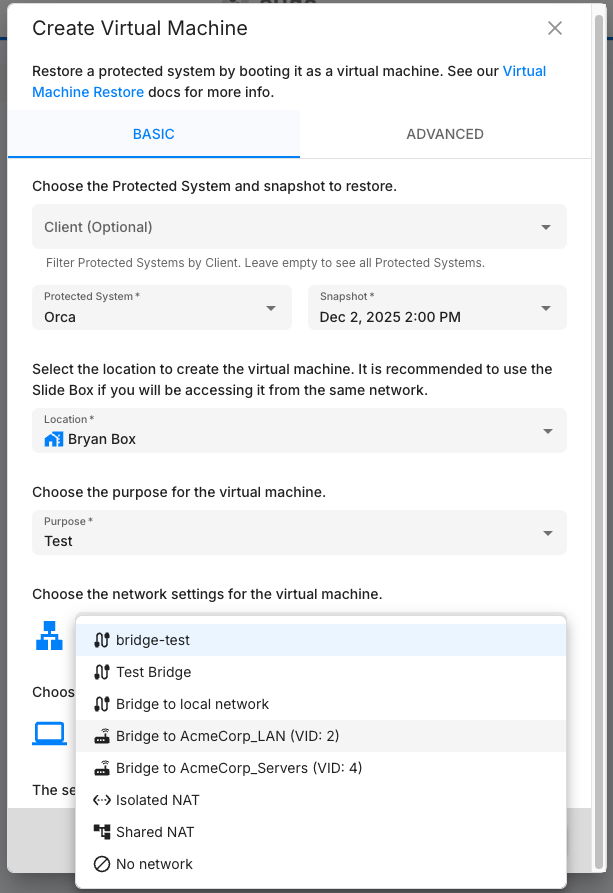
The "Create Virtual Machine" dialog lets you pick the protected system you'd like to restore, as well as a snapshot to restore from. You can also choose the virtualization location (local or cloud) and the virtualization settings (e.g. CPU, memory, and network).
Here's an overview of all settings in the "Basic" tab:
- Protected System: The protected system you'd like to restore.
- Snapshot: The snapshot you'd like to restore from.
- Location: The location where the virtual machine will be created. This is either the local Slide Box or the Slide Cloud. If the snapshot is not available in both locations, you can only choose the location where the snapshot is available.
- Purpose: The purpose of the virtual machine. Available options are:
- Test (default): The virtual machine is for testing purposes. The machine will automatically expire and be deleted after 2 weeks and will be shutdown 4 days before expiration. The expiration date can be extended in Console. Emails will be sent before shutdown and expiration actions are taken.
- Disaster: The virtual machine is being created in a disaster scenario. The machine will automatically expire and be deleted after 2 months and will be shutdown 4 days before expiration. The expiration date can be extended in Console. Emails will be sent before shutdown and expiration actions are taken.
- Network: The network the virtual machine will be connected to. Available options are described in the networking section as well as in the networks page.
- CPUs: The number of virtual CPUs the virtual machine will have.
- Memory: The amount of memory the virtual machine will have.
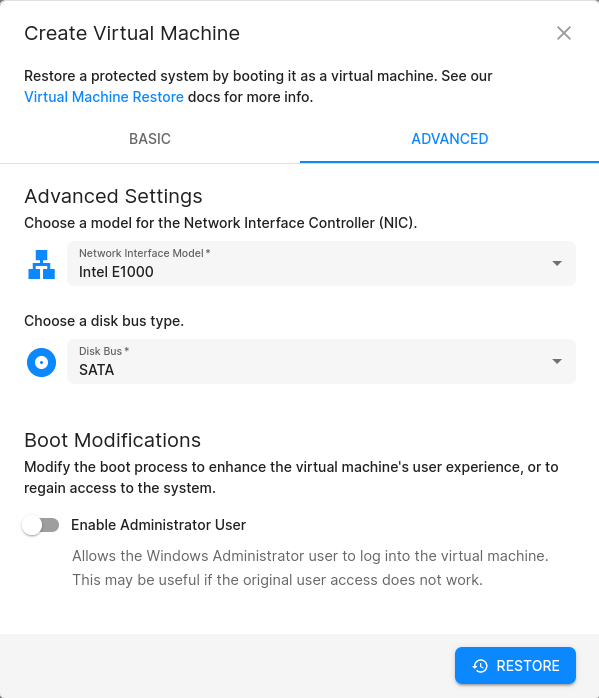
And a list of all settings in the "Advanced" tab:
- Network Interface Model: The network interface model the virtual machine will use. Available options are "VirtIO" (default), "Hypervisor Default", "Intel E1000", and "Realtek RTL8139". The "Intel E1000" model is compatible with most versions of Windows. VirtIO will provide the best performance.
- Disk Bus: The disk bus the virtual machine will use. Available options are "VirtIO" (default) and "SATA". VirtIO drivers are automagically installed during boot of a restore. "SATA" is the most compatible and can be used if compatibility issues are detected. VirtIO will provide the best performance.
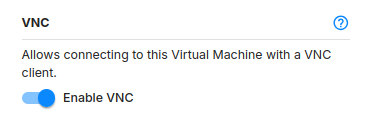
- Enable VNC: If enabled, allows standalone VNC clients to connect to the VM.
- Enable Administrator User: If enabled, allows the Windows Administrator user to log into the Windows VM in addition to the existing Windows users. This option is helpful if login is not working properly, e.g. due to issues with Windows Hello.
- Force Boot Menu: Instructs the VM to force the system info into the boot menu upon initial start. The ESC key (or F2) can be used to get into the BIOS.
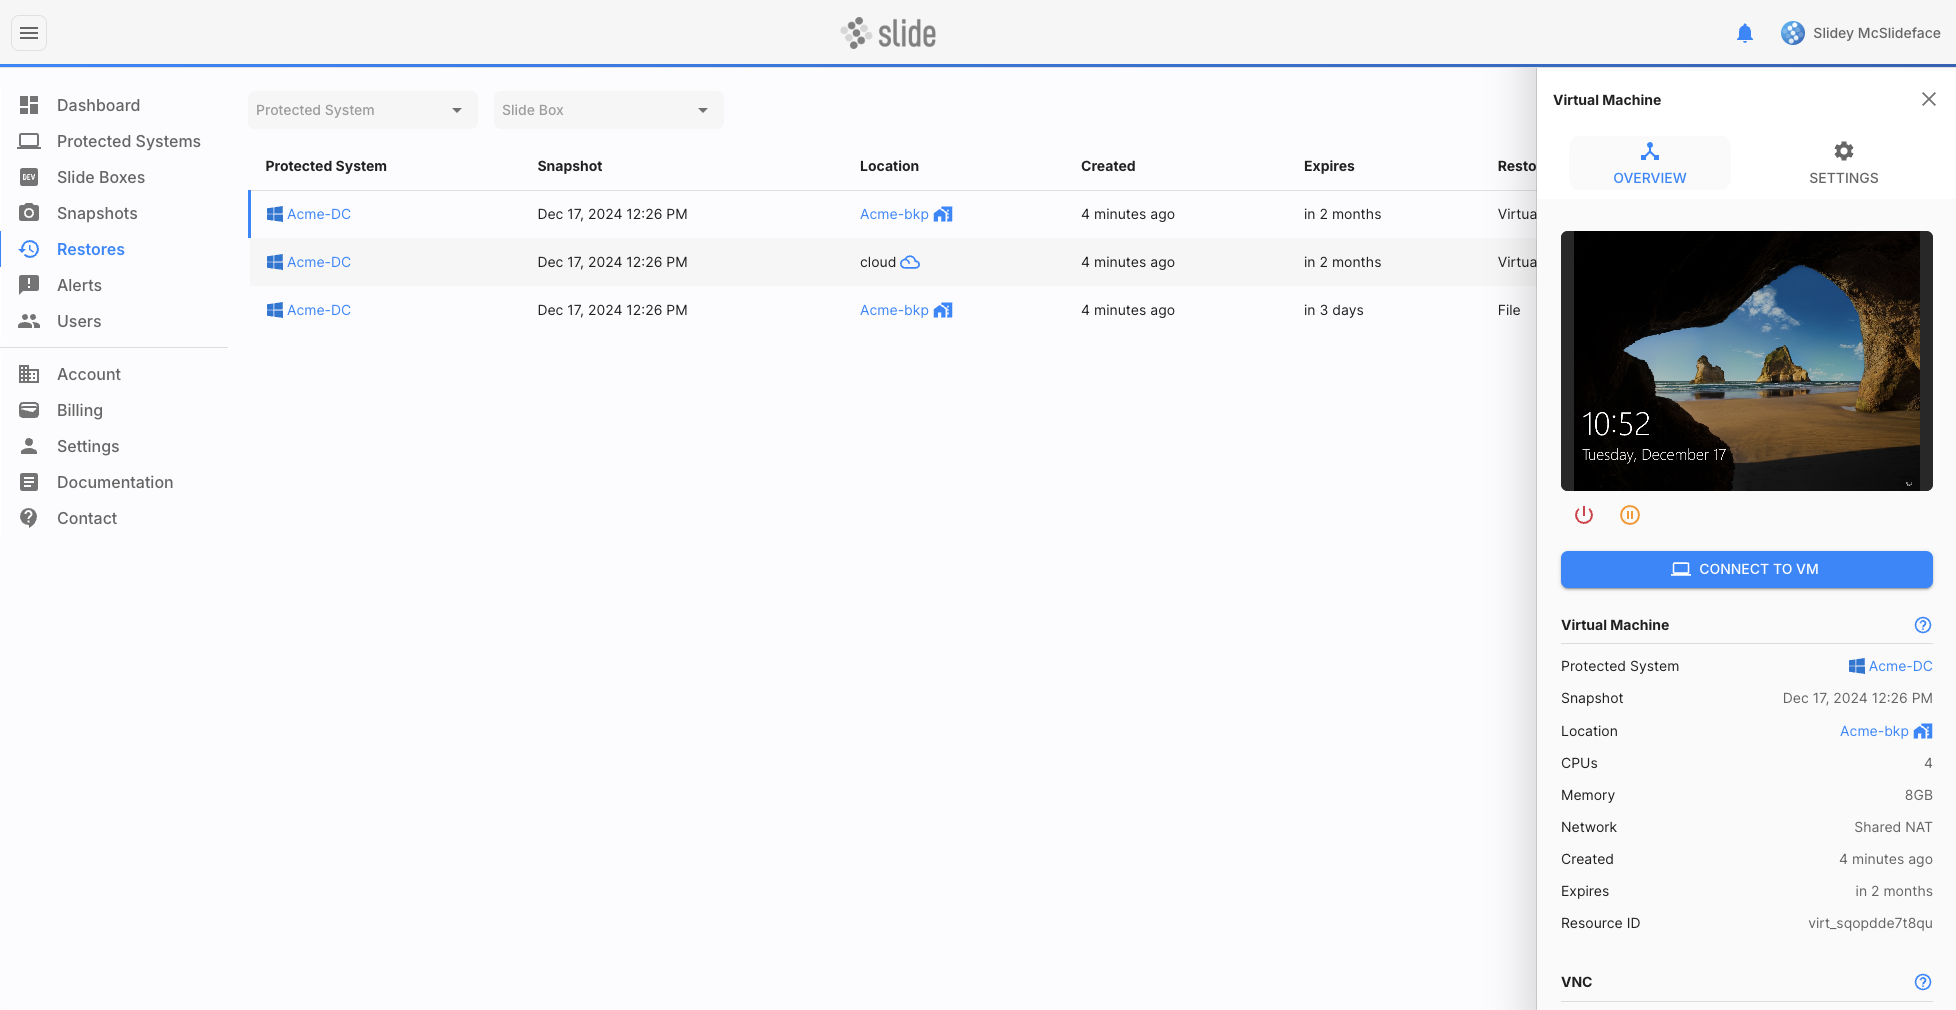
After you've filled out the form, click the "Create" button to start the virtualization. The virtual machine will be created, and you can access it by clicking on the link in the Restores page list.
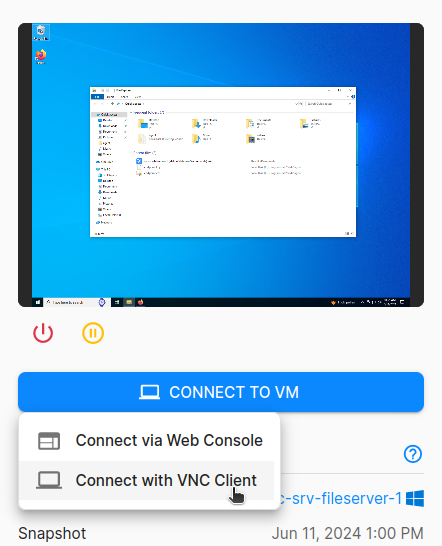
From the virtualization sidebar, you control the virtual machine's power state (turn it off/on and pause/resume it) or access its remote console. To open the console, click the "Connect to VM" button, and either select "Connect via Web Console" or "Connect via VNC Client". The console is a VNC connection to the virtual machine, which lets you interact with the machine as if you were sitting in front of it.
Web Console
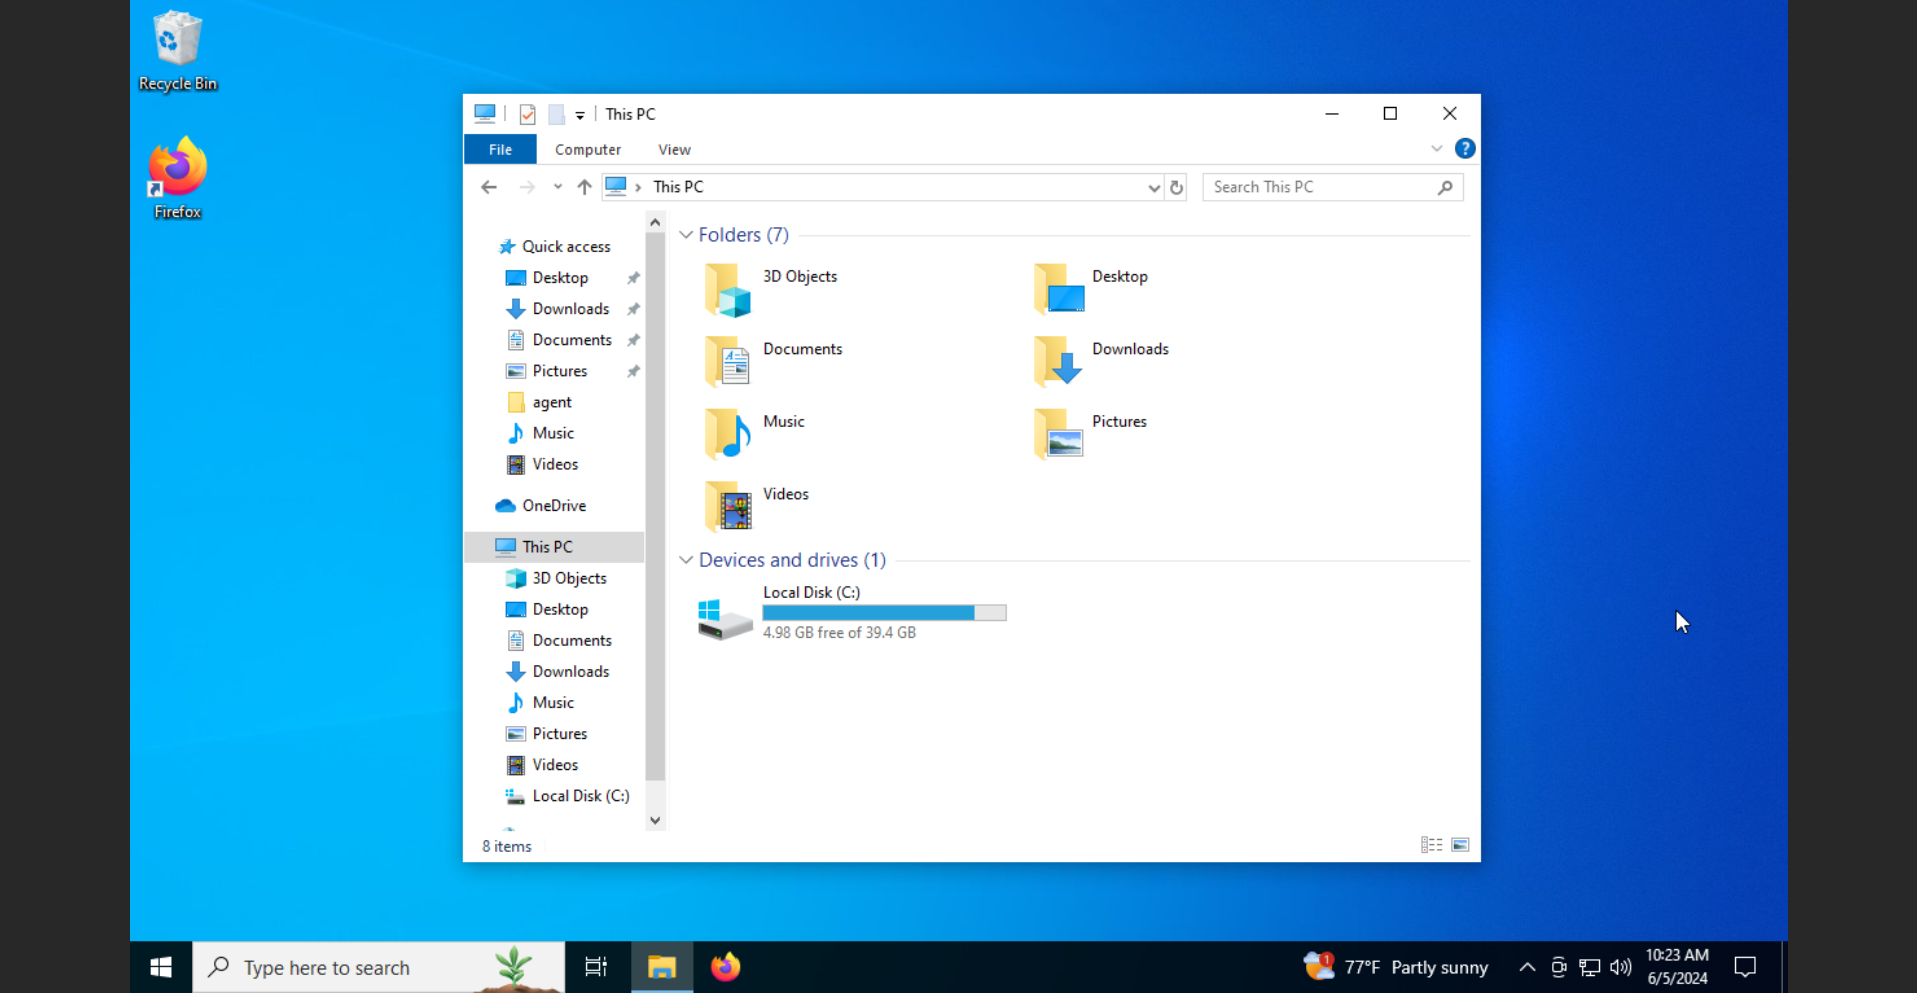
The Web Console will open a new tab and show the Windows Desktop in the browser, similar to here:
VNC
The VNC Client option will download a VNC connection file that you can open with a VNC client of your choice. This is useful if you prefer a standalone VNC client or if you want to use a VNC client that supports more features than the web based console. Suggested VNC clients are TightVNC or RealVNC Viewer. VNC is disabled by default, but can be enabled in the virtual machine settings sidebar and works with any VM.

After downloading either of these viewers, you'll be able to connect to a virtual machine by simply downloading the file and opening it with the viewer. The viewer will then connect to the virtual machine and show you the Windows Desktop. Here's an example of what it looks like in TightVNC:

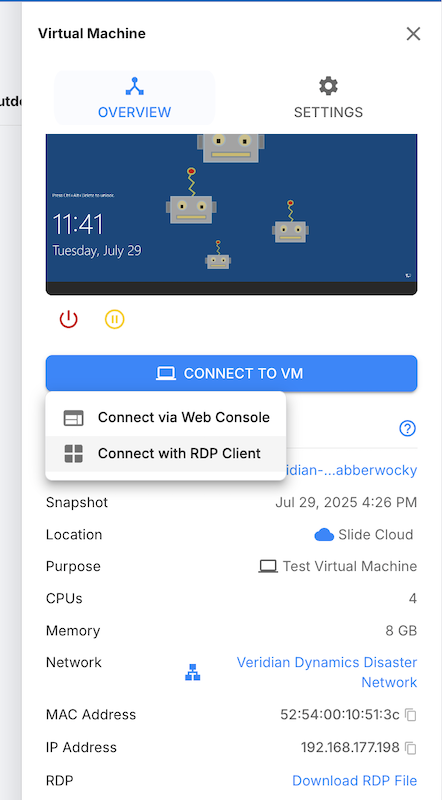
RDP
The Connect with RDP Client creates a .rdp file that can be imported by your RDP client. The RDP client can be used when you are on the same network. In order for the RDP button to become available, the server you are virtualizing must have RDP enabled. The RDP button will only appear if the network type of the restore is bridged or a disaster network.
Networking
When creating a VM, you can select which network the VM will be connected to. VMs can be bridged to the local network, NATed, attached to a disaster network or bridged network, or spun up without network. The available options depend on whether the VM is created on the Slide Box or in the Slide Cloud.

Available network options:
- Disaster Networks: The virtual machine will be connected to the Disaster Network you defined. Disaster networks are private networks that allow you connect VMs across different locations. Learn more on the Networks page.
- Bridged Networks: The virtual machine will be connected to the Bridged Network you defined. Bridged networks are networks that are bridged to the local network of a specific Slide Box. VMs can be attached to bridged networks regardless of their physical location, and will then receive an IP address from the local DHCP server. Learn more on the Networks page.
- VLAN Bridges (only available on Slide Box): If your Slide Box has virtual interfaces configured, you can bridge the virtual machine directly to a specific VLAN. Select Bridge to [Interface Name] (VID: [tag]) to connect the VM to that VLAN. The VM will receive an IP address from the DHCP server on that VLAN, or you can configure static networking within the guest OS.
- Bridge to local network (only available on Slide Box): The virtual machine will be connected to the same network as the Slide Box. The VM will receive an IP address from the local DHCP server, and will be able to communicate with other devices on the local network.
- Shared NAT (only available on Slide Box): The virtual machine will be connected to a dedicated network with its own IP space. The machine will have internet access, and will be able to access other VMs on the same Slide Box.
- Isolated NAT: The virtual machine will be connected to a dedicated network with its own IP space. The machine will have internet access, but is isolated from other virtual machines.
- No network: The virtual machine will not be connected to any network.
Note
VLAN bridge options only appear if your Slide Box has virtual interfaces configured. See Virtual Interfaces for setup instructions.
Boot Modifications
In order to run your Protected System as a virtual machine, several modifications are required to the boot volume. In the interest of transparency we will keep an updated list of those modifications here.
- Disable Slide Agent: The Slide Agent is disabled on restored systems. This is to ensure two agents aren't running at once.
- Driver Installation: We install official VirtIO drivers maintained and digitally signed by Red Hat, including the
viostor(storage) andnetkvm(network) drivers. These are required for optimal performance and compatibility when running Windows on KVM-based hypervisors. For reference, see Red Hat’s documentation on installing the KVM Windows para-virtualized drivers. - Set SanPolicy (only set for restores using disk bus type = virtio.): For VirtIO disks, Slide uses the Red Hat Virtio Disk Driver. This driver presents virtual disks to Windows over a SCSI bus. Some Windows editions (we have tested Windows Server) have a default SanPolicy set to "OfflineAll" which means that when Windows detects a new SCSI disk it will fail to online it. To ensure all restored disks come online automatically we set SanPolicy = OnlineAll.
- Disable HVCI: Disable Hypervisor Enforced Code Integrity (HVCI), which has been known to block certain drivers — including Intel’s legacy E1000 network driver — from loading. This change avoids boot-time errors related to blocked drivers.
- Disable Passwordless Login: Disable Windows' passwordless-only login policy. This ensures password-based login is always available during recovery. Passwordless sign-in methods like PIN and biometrics rely on the machine's physical TPM (Trusted Platform Module), which isn't present during a virtual restore.
- Disable Video Idle Timeout: Disable the power scheme setting that turns off the display after a period of inactivity. This ensures the screen remains active during interactive restore workflows.
- Enable Administrator Login (On request only): Enable login access for the built-in "Administrator" account. This is useful on systems where the account exists but is not enabled for interactive login by default.
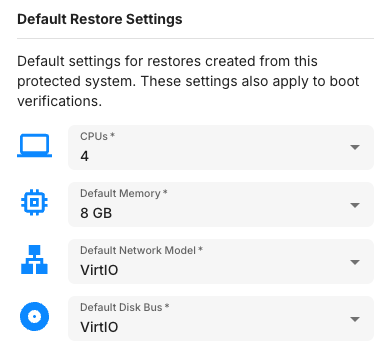
Default Restore Settings
Default restore settings can be set for virtualizations. These will apply when creating a VM in the UI, and when a VM is created for snapshot boot verification.
In order to change the default settings, navigate to "Protected Systems" in the console. Click on the system you'd like to modify, then Settings.
In this dialog you can change the default for
- CPU count
- Memory amount
- Network Model Type
- Disk Bus Model Type
Common Issues
During a disaster, my agent does not automatically start backing up again
When a system is virtualized in Slide, we automatically disable the Slide Agent to prevent accidental backups. In order to get backups running again simply enable the Slide Agent via the services menu services.msc.
Gray screen on sidebar and web console
If you virtualize a system and have a persistent gray screen this is likely caused by the networking configuration on the local network your computer is on. You may want to check that all Slide IP addresses are permitted on your local firewall. Review Networking Requirements to confirm the IP addresses that your network must have access to.
Login with Windows Hello
Many newer laptops and workstations enable Windows login via PIN, Facial Recognition, or Fingerprint. This feature is known as Windows Hello and is a convenient way to log into your Windows machine without typing a password. It works by storing the credential information (PIN, etc.) in a Trusted Platform Module (TPM), a special piece of hardware inside the computer that is required for Windows Hello to work.
Windows Hello credentials cannot be accessed by the backup process, and cannot be backed up. Due to this technical restriction, it is not possible to use Windows Hello to log into a VM restored from a backup, or a machine recreated from an image export. Instead, you will need to use a password to log into the virtual machine.
File Restore
A file restore lets you instantly browse files from a backup and download or push one or multiple files at a time. This is useful for quickly restoring a single file or folder from a backup without having to restore the entire system.
Windows Server Deduplication
Systems with Windows Server Data Deduplication enabled will have files that appear in file restores but are not usable in their deduplicated form. Deduplicated files are stored as reparse points and stub files on disk, and only the deduplication engine on the original system can reassemble them into usable data. Because of this, individually restored files will be incomplete or corrupted.
The backup data itself is fully intact — a virtualization or image export will boot the full Windows environment, including the deduplication engine, and all files will be accessible normally.
Recommendations:
- Disable Windows Deduplication on critical volumes where file-level restores are important to support.
- Plan to use VM-based restores (virtualization or image export) when deduplication is enabled, rather than relying on file restores.

The "Create File Restore" dialog lets you pick the protected system you'd like to create a file restore from. You can pick the snapshot and the location (Slide Box or Slide Cloud) where the snapshot is available. After you've filled out the form, click the "Restore" button to start the file restore.
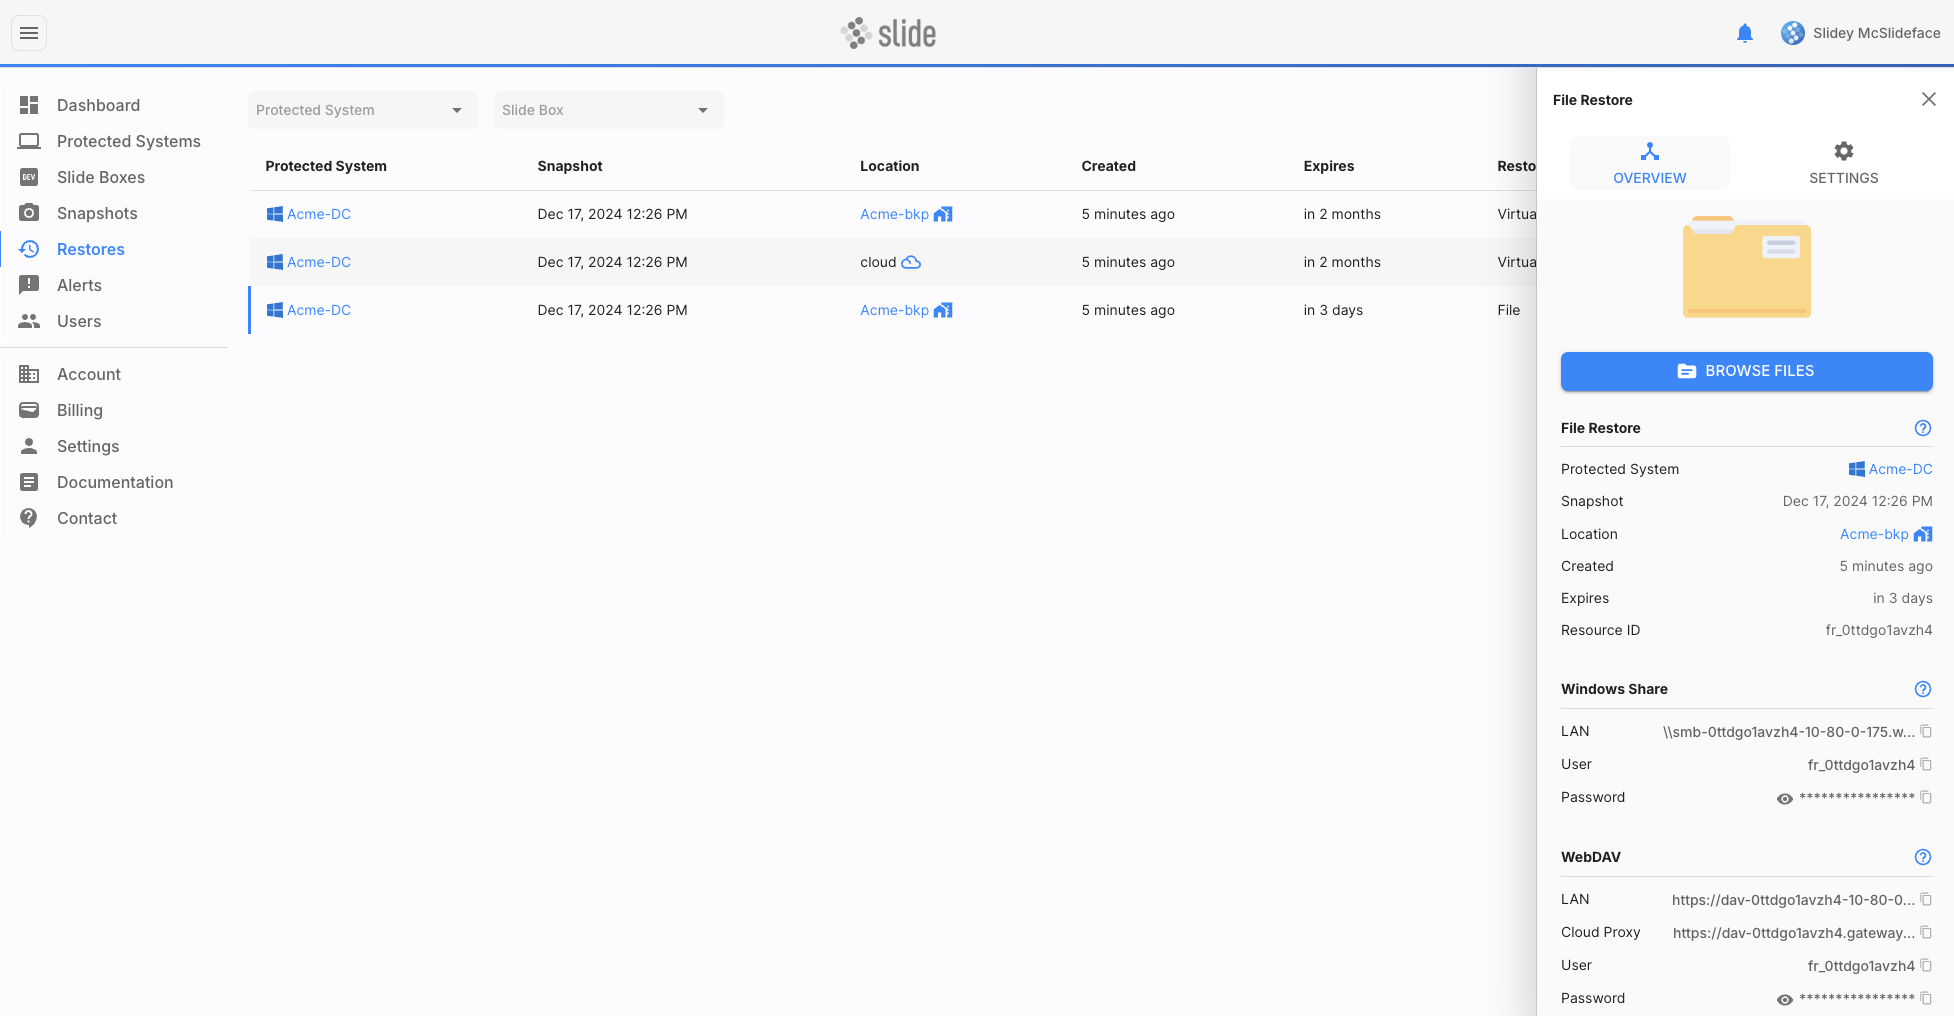
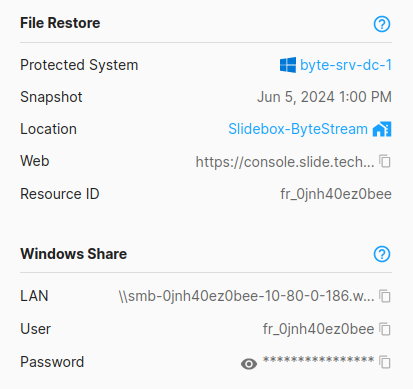
You'll see a sidebar with details about the restore, as well as options of how to access it. You can access the files via:
- Web Browser: A web-based file browser that lets you download files directly from the browser.
- Push to Protected System: A button in the web browser that lets you push files back to the original protected system.
- Windows Share (CIFS/SMB/Samba): A Windows share that you can access from your Windows, macOS, or Linux machine. This option is only available if the snapshot is available on the Slide Box.
Web Browser
After clicking the "Browse Files" button, you'll be taken to the web-based file browser. Here you can navigate through the file system, push files to the protected system, and download files or folders by clicking on them.
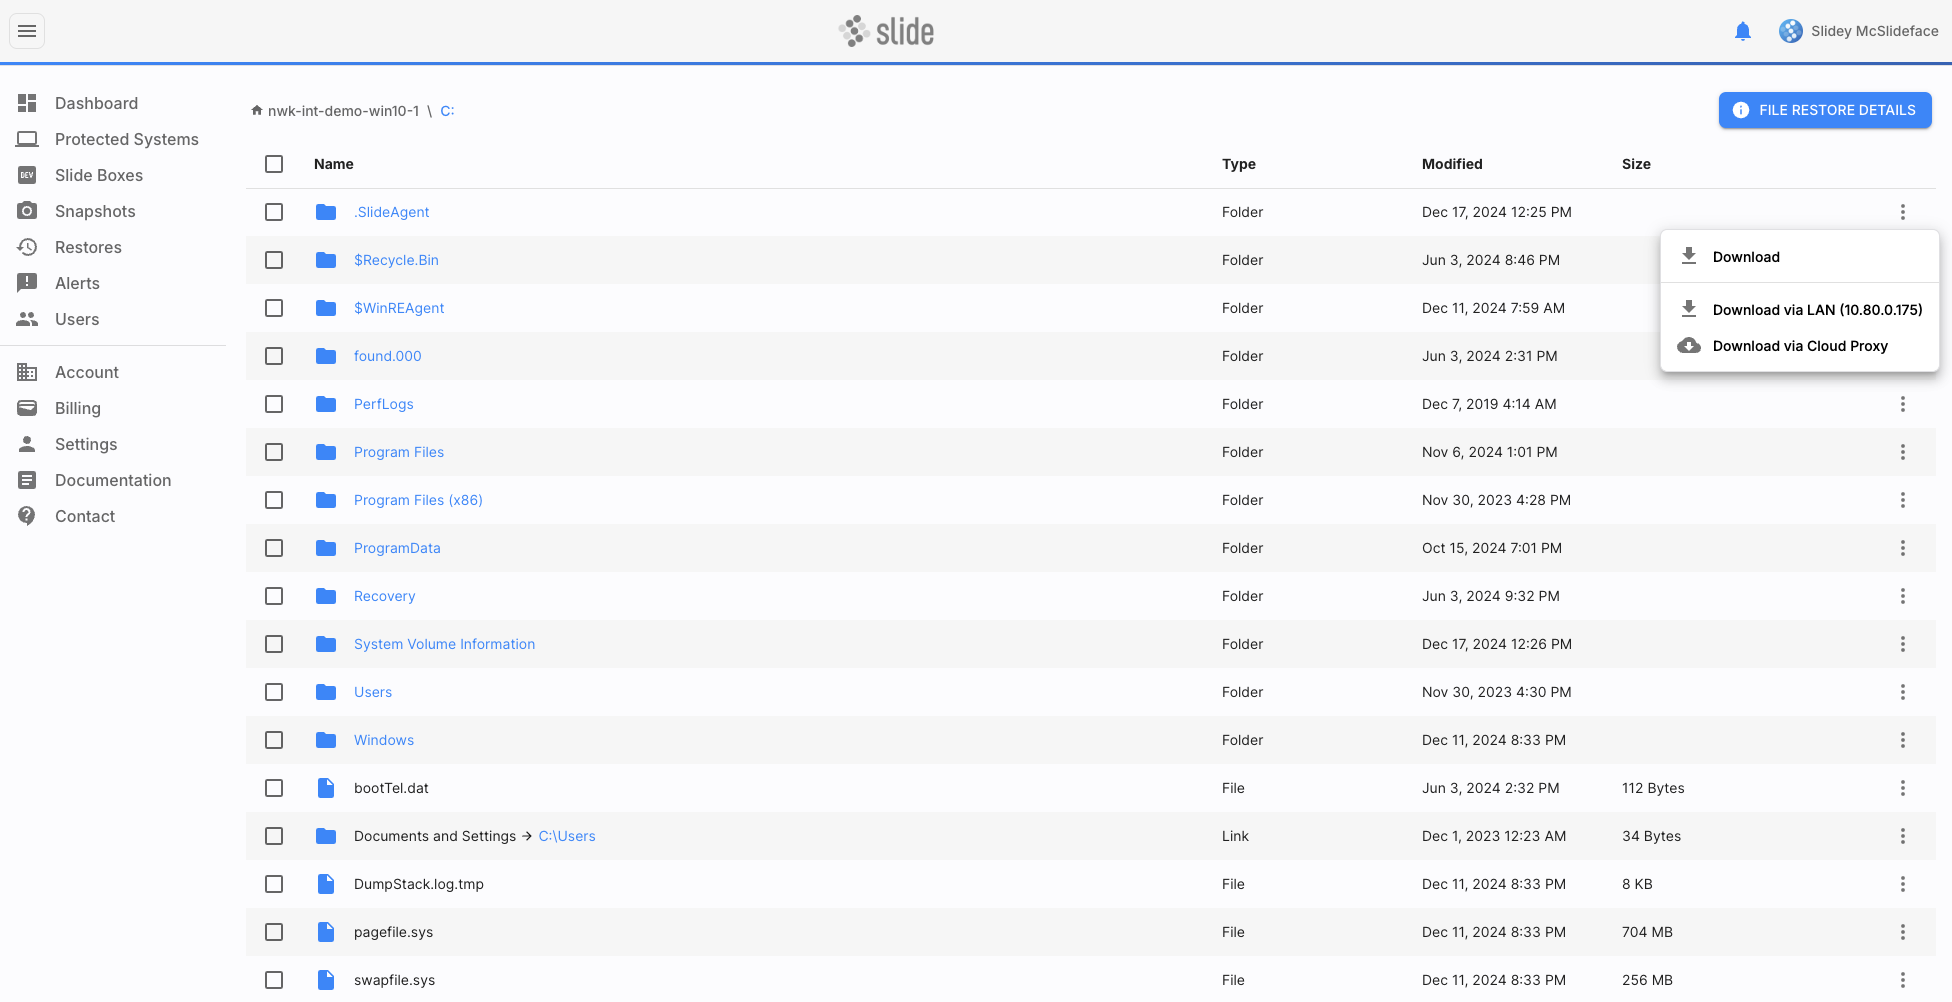
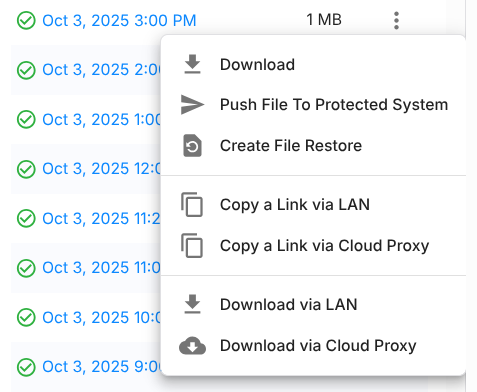
Downloading files is straightforward: click on the three-dot menu next to the file or folder you'd like to download, and then click the "Download" button. The file will be downloaded to your local machine. If the file is a folder, the downloaded file is a ZIP archive containing the folder and all its contents.
If the snapshot you selected is located on the Slide Box, you'll see two options to download the file, and one to push the file to the protected system:
- Download via LAN: This option is faster, but requires that your machine is on the same network as the Slide Box.
- Download via Cloud Proxy: This option is slower, but works from anywhere in the world. It routes the download through the Slide Cloud, which can be slower than a direct connection, especially for large files or if the Slide Box has a poor uplink connection.
- Push to Protected System: This option is fastest, but only restores files and requires that your protected system is on the same network as the Slide Box.
You can also select multiple files or folders by checking the boxes next to them. You will then see "Download" and "Push to Protected System" buttons at the top of the file browser.
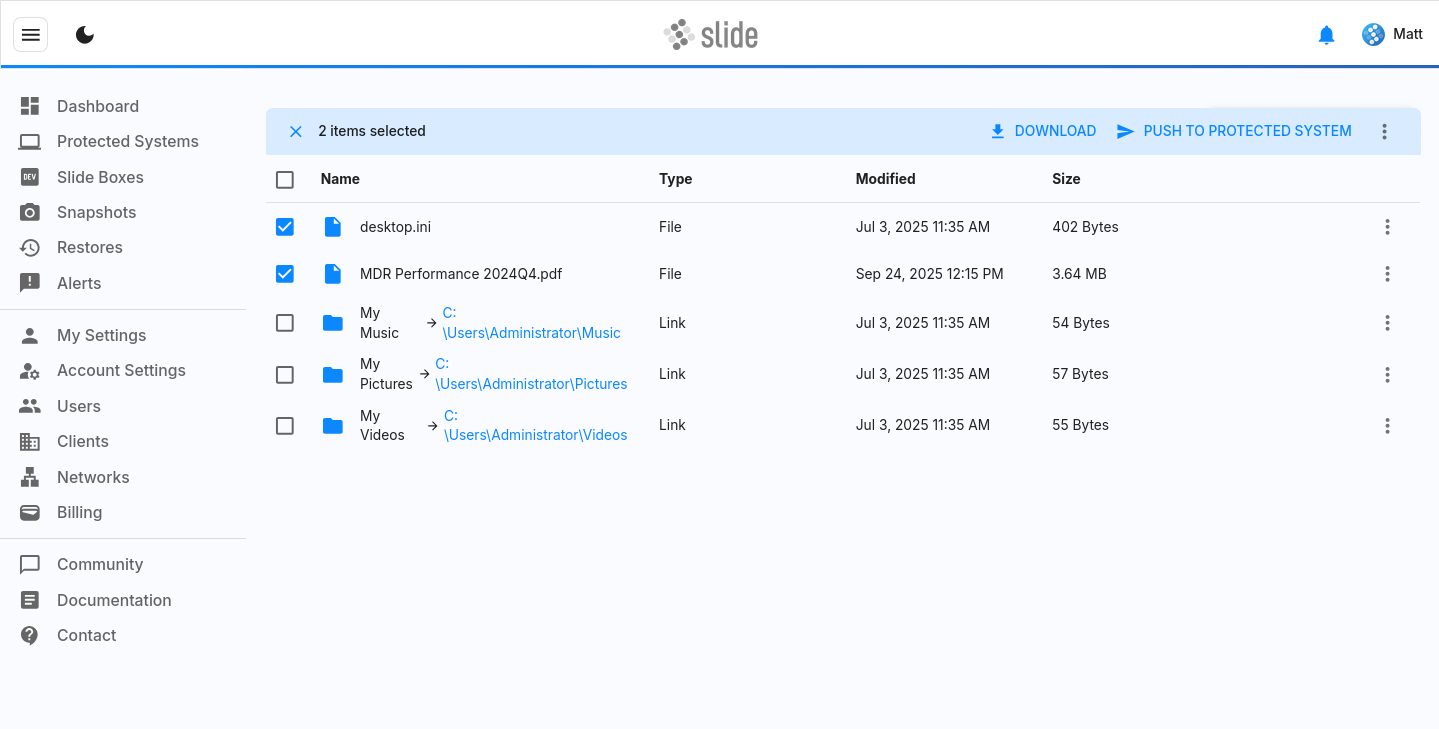
Push to Protected System
Push to Protected System lets you send files from a file restore back to the original protected system. This is useful for quickly restoring a few files from a backup directly from the file restore web browser. Pushed files are sent from the Slide Box to the Slide Agent associated with the file restore and saved into a SlideRestore folder. Push to Protected System is only available if the snapshot is located on the Slide Box.
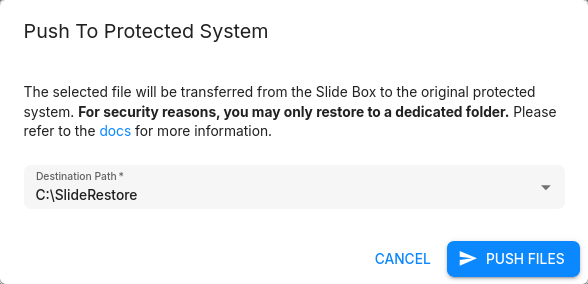
The "Push to Protected System" dialog lets you choose the drive letter that the files will be restored to. For security reasons, the agent only allows restoring within a SlideRestore folder at the root of each drive.
Note
At this time, we do not support pushing folders, and pushed files will not have NTFS ACLs restored.
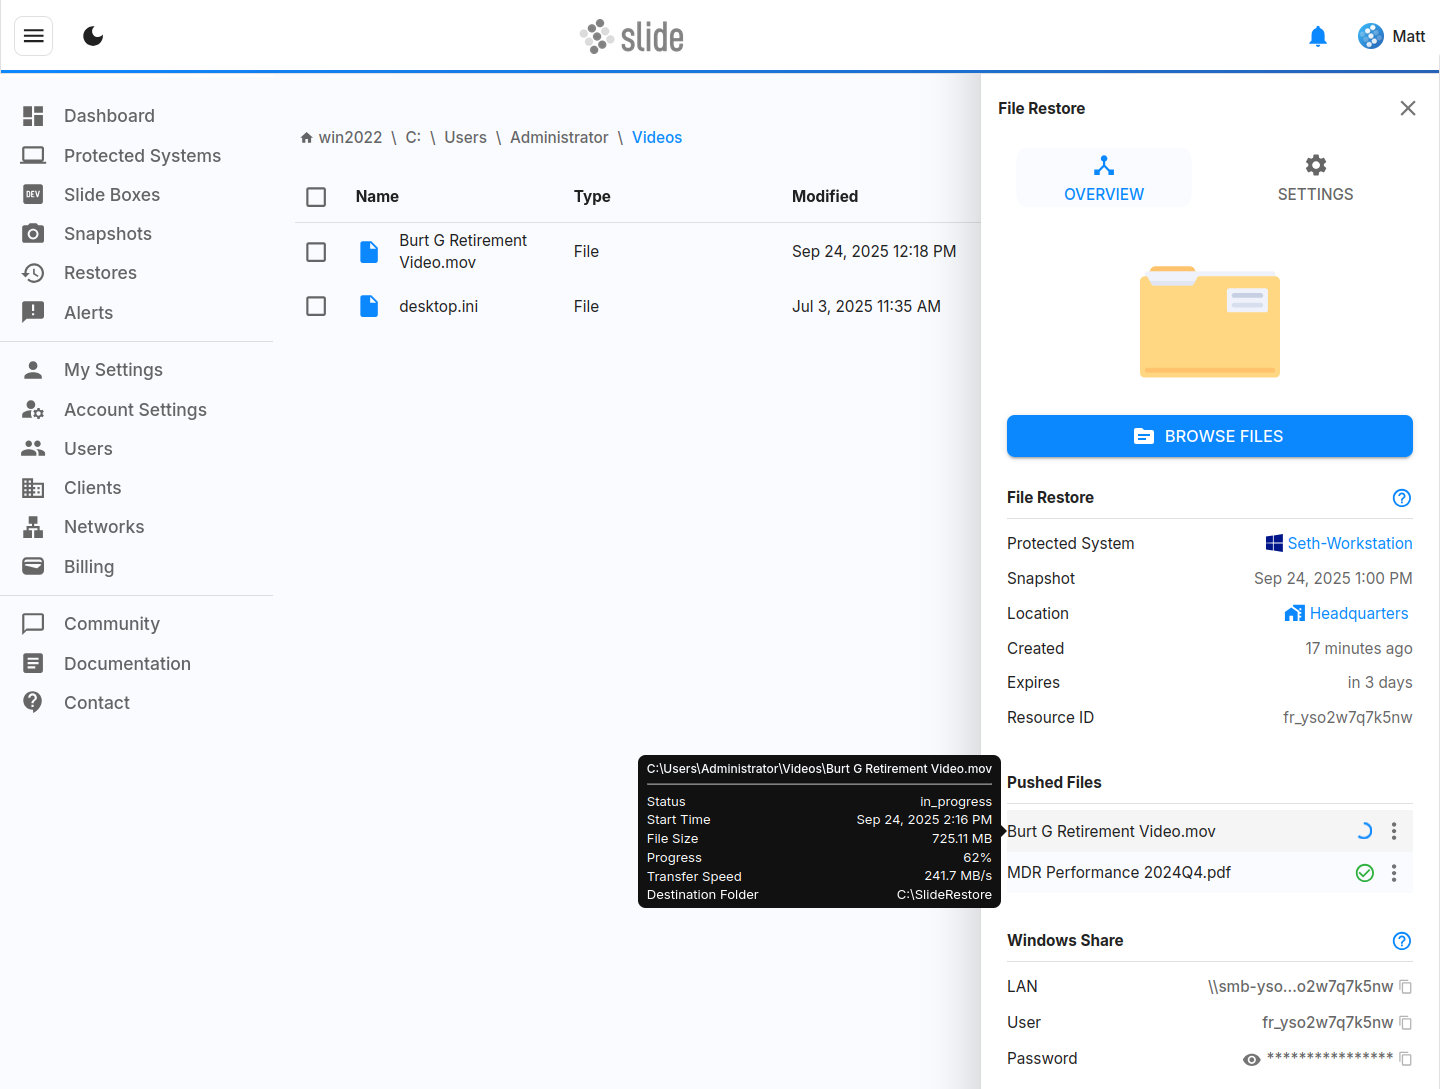
Once a push is initiated, the file restore sidebar will open and show the transfer progress of your files as they are sent from the Slide Box to the Slide Agent.
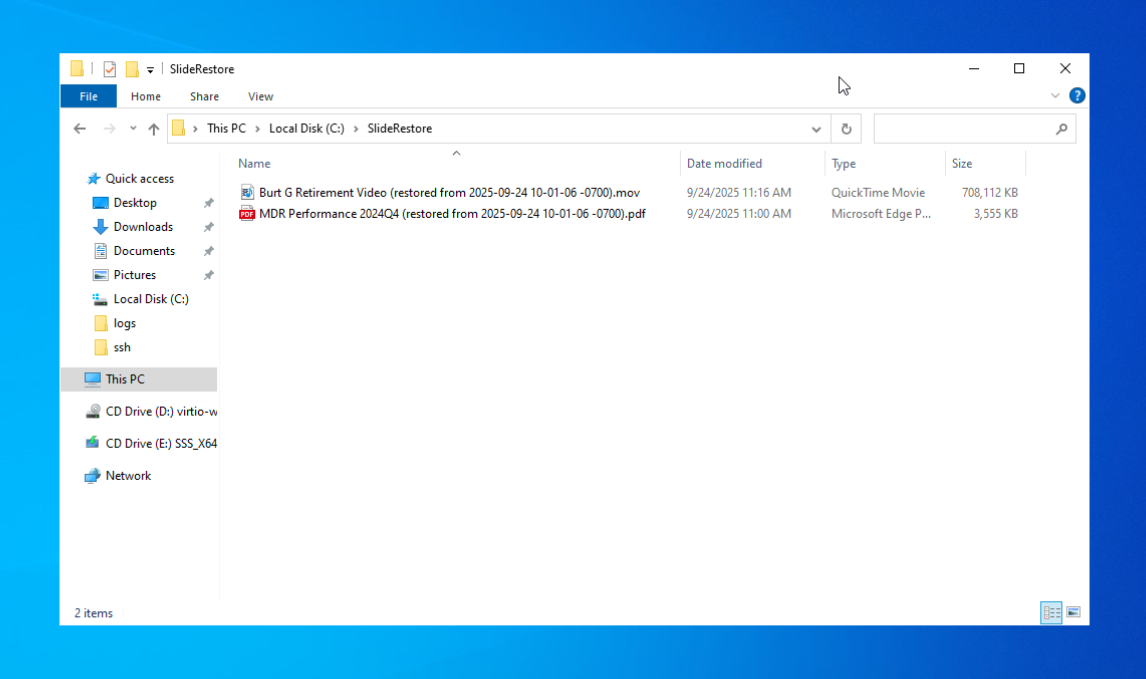
As each push completes, you will see your files show up in the destination folder on the protected system.
Windows Share
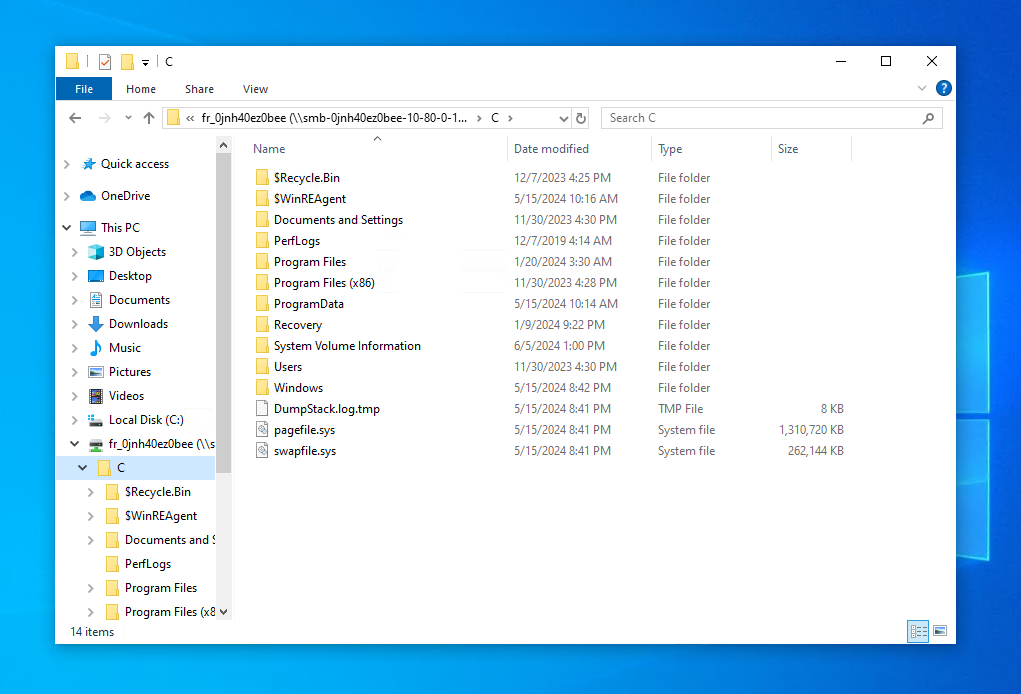
Accessing a file restore via a Windows share is only available if the snapshot is located on the Slide Box. You can access the share from any Windows, macOS, or Linux machine that supports the CIFS/SMB/Samba protocol. Here's how you connect to the share by mapping a drive in Windows Explorer:
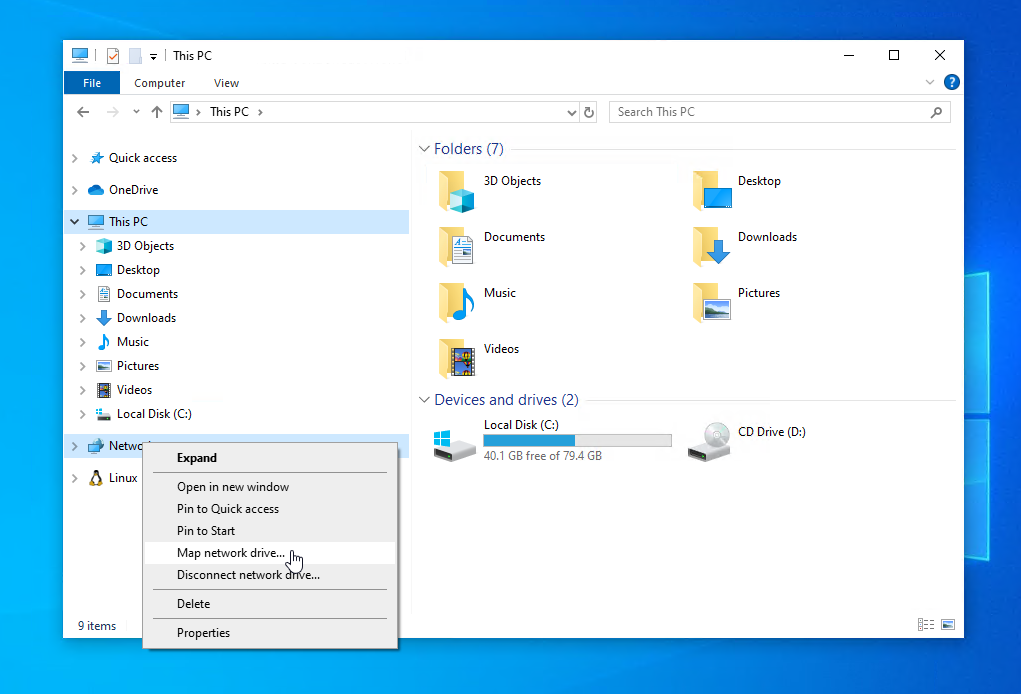
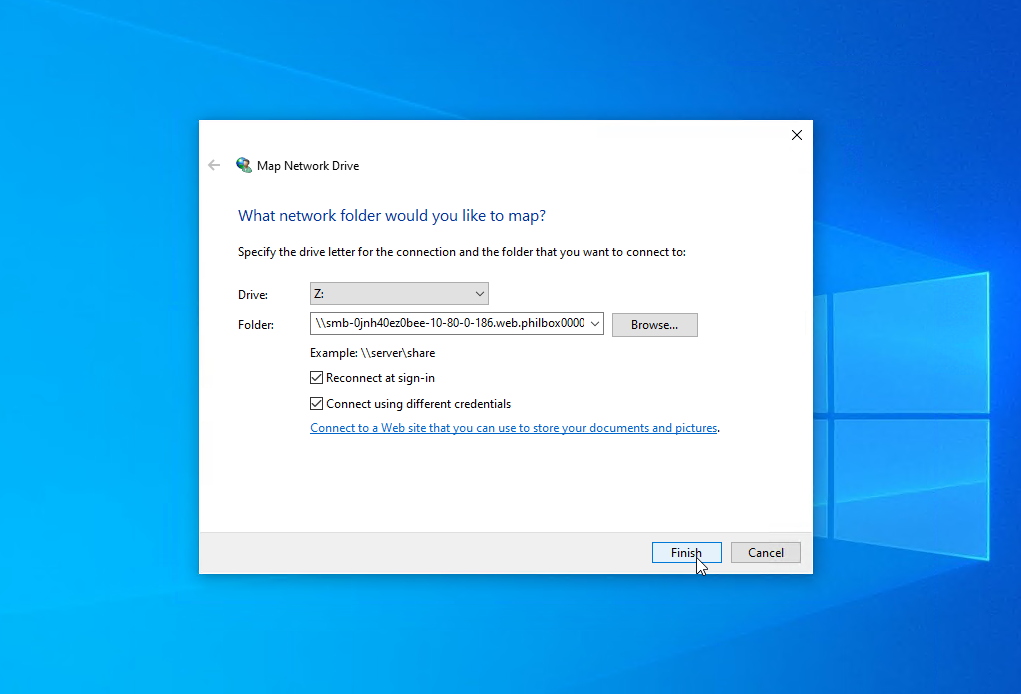
In Windows Explorer, right-click on "This PC" and select "Map network drive". In the dialog that opens, enter the share path listed in the sidebar of the file restore into the "Folder" field. The share path may look something like this: \\smb-...slidebox.tech\fr_0jnh40ez0bee. The hostname resolves to the local IP address of the Slide Box.
When asked for credentials, use the credentials listed in the sidebar of the file restore:
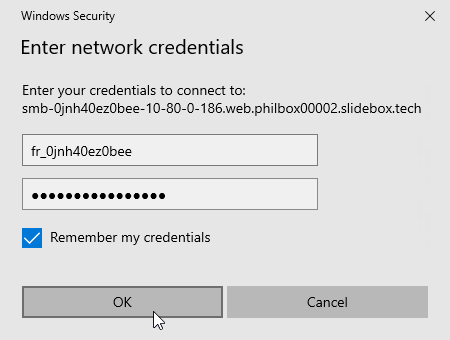
Once you successfully mapped the share, you can access the files like you normally would in Windows Explorer. You can copy, move, or delete files, as well as create new files or folders.
File Searching
File Indexing allows you to search for versions of files across all snapshots of a protected system, and easily restore those files. This is useful when you have a file to restore, but don't know which snapshot you want to restore it from.
File Indexing first must be enabled for a protected system before it can be used. You will find this option in the protected system's settings tab. Note that the initial indexing process may take some time after first enabling it.
There is a trivial storage cost to enabling indexing. Approximately 14MB is used for a 50-100GB drive with ~150,000 file paths across many snapshots for a protected system. As more snapshots are taken over time, space usage will remain minimal, only slightly increasing as new file paths are added. Indexing can be disabled at any point in time.
The file index only is present locally on Slide Boxes, and does not exist in the Slide Cloud. Additionally, it is always encrypted, just like regular backups. User-Managed Encryption Passphrases will also apply to the file index's encryption.
File Search only searches through backed up files. The index does not have entries for directories, and it does not follow symlinks either. Indexing also skips over some common files and directories containing any of the following in their path:
C:\Windows\,\$RECYCLE.BIN\,\System Volume Information\,.lnk\temp\,\tmp\,.tmp,.temp\cache\,\caches\\.git\,\.idea\,\node_modules\.slideagent
Once indexing is enabled, numerous ways to search for files will now be accessible:
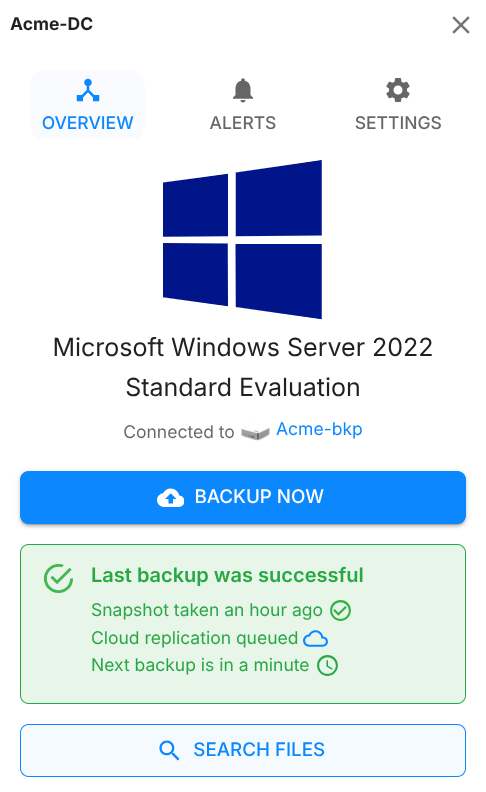
- The simplest way is to press "Search Files" directly from a protected system's sidebar.
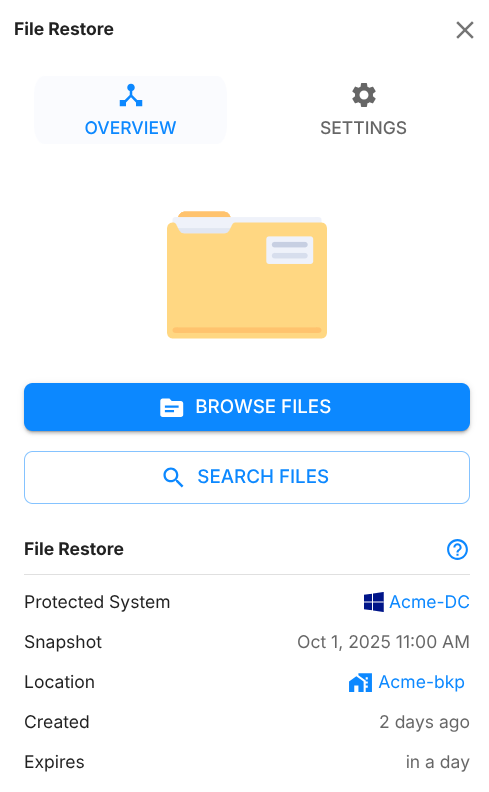
- From a File Restore's sidebar, you can search through all the files backed up for its protected system.
- When browsing a File Restore, you can also search through all backed up files for the protected system in the upper right corner.
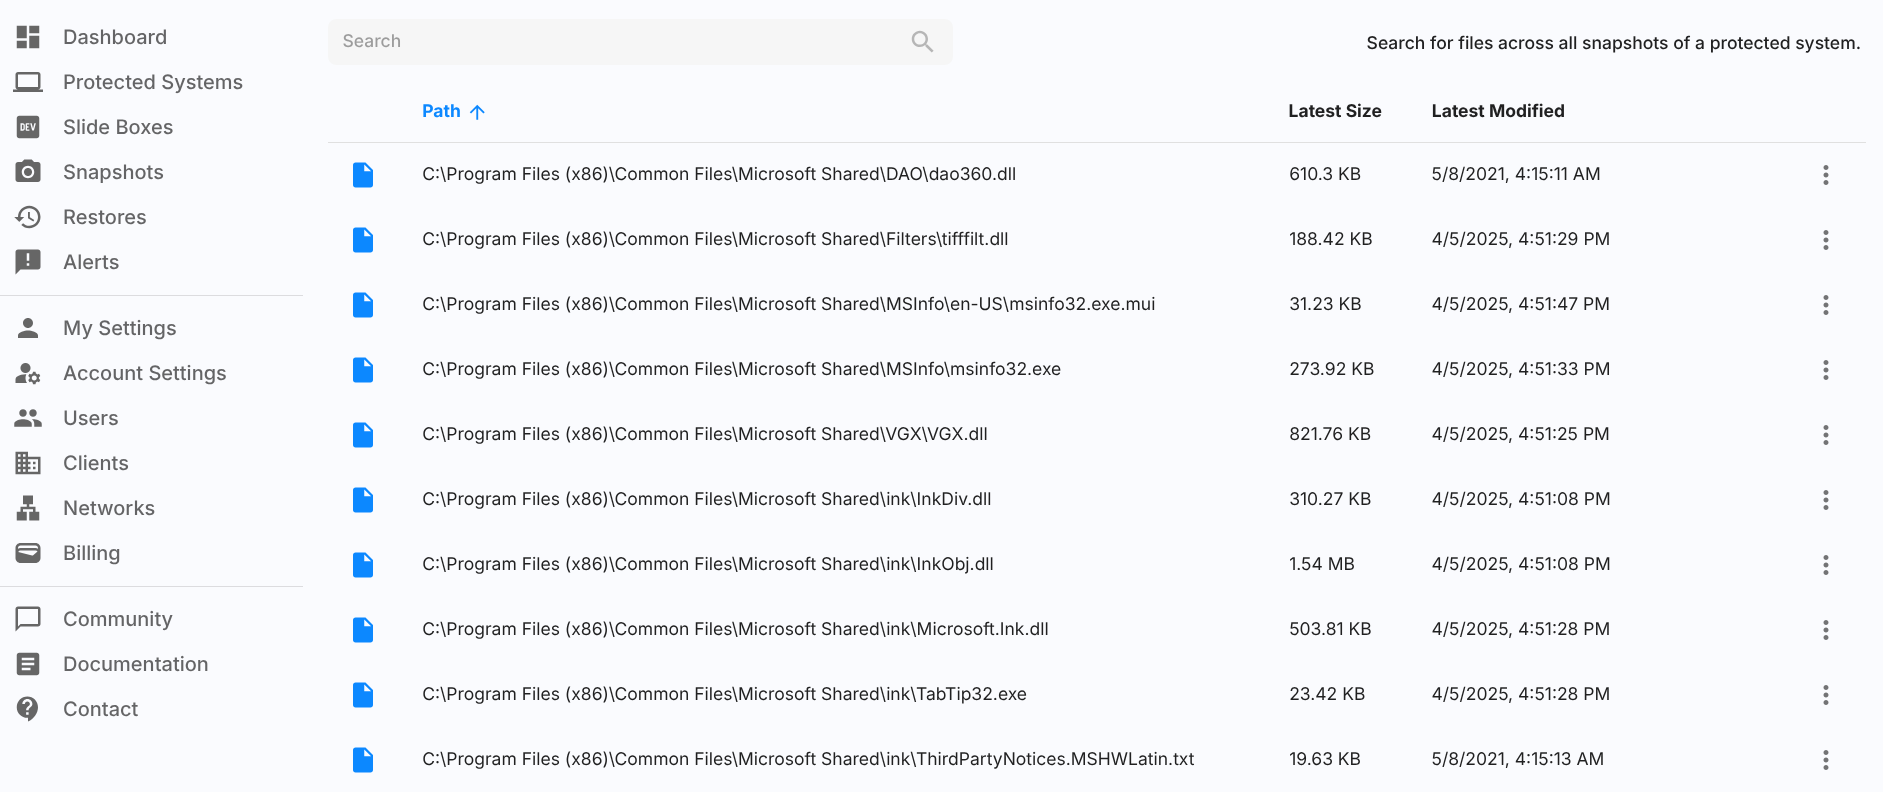
Various ways to search for files
Searching for files is as simple as typing in the search box in the upper left. Both Windows and UNIX-style paths will work, and the search is case-insensitive. Each result represents the latest backed up version of the file.
Once you have found a file of interest, click on it to view more information about it. The File History section shows each snapshot containing the file and the size of the file at the time of the snapshot, making it easy to find a specific version. You can click on the path at the top to copy it to the clipboard.

With a specific version of a file, you can now restore it in various ways. Each of the options will first create a File Restore for the snapshot if it does not already exist, and performs the selected action.
If you simply want to restore the latest backed up version of a file, you can do so directly in a single click from the search results list. You can view the full set of options for the file by clicking on the three-dot button on the far right.

With a User-Managed Encryption Passphrase, you will need to authenticate the file restore creation process by entering the protected system's passphrase, the details about the file restore will be pre-filled for you.
Tips:
- Any searches beginning with a drive letter (e.g.
C:\orD:\) will only show results from that drive. - Searches will perform a substring search, and will display any files containing the search text found anywhere within the path.
Image Export
An image export lets you instantly export the disks corresponding to a backup as VHD/VHDX or raw disk image files. These disk image files can then be used when creating a virtual machine in an environment of your choosing. You may for instance choose to create a new VM in Microsoft Hyper-V, VMware vSphere, QEMU/KVM, or VirtualBox and attach the exported images to it.
Note
Image Exports are read/write to enable BMR and various hypervisor activity. Learn more about how to perform a BMR.
Supported image file formats:
- VHD: The older disk image format used by Hyper-V. It supports disks up to 2 TB in size.
- Fixed VHDX: The newer disk image format used by Hyper-V. It supports disks up to 64 TB in size. The size will match the size of the disk in the backup. Fixed VHDX is the recommended format for Hyper-V. If you do not have the storage space available for the entire disk, see Dynamic VHDX below.
- Dynamic VHDX: A VHDX disk image that grows as data is written to it. The initial size will be smaller than a Fixed VHDX, however, it depends on the amount of fragmentation and used data on the disk in the backup.
- Flat VMDK: A VMDK disk image primarily used by VMware but also many other hypervisors (Proxmox, QEMU/KVM, Nutanix and Scale).
- QCOW2: A QCOW2 disk image is used by QEMU/KVM (and Proxmox). The data is compacted, and the image size will typically be around the used size of the disk in the backup.
- Raw: A raw disk image file that can be used by most virtualization platforms. QEMU/KVM, VirtualBox, and VMware all support raw disk images.
The "Create Image Export" dialog lets you pick the protected system you'd like to create a file restore from. You can pick the snapshot and the location (Slide Box or Slide Cloud) where the snapshot is available. After you've filled out the form, click the "Restore" button to create the image export.
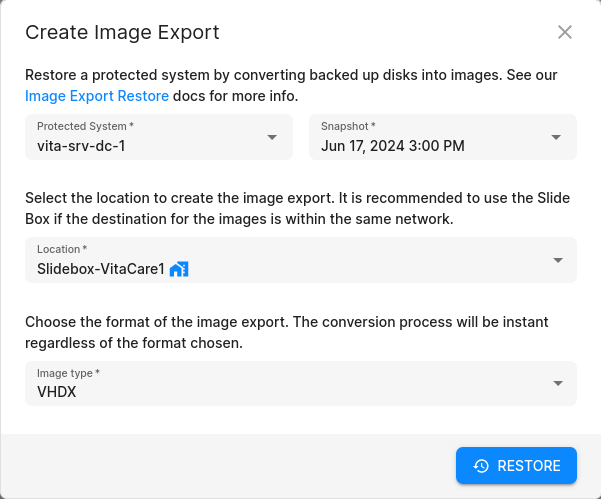
Here's an overview of all settings in the "Basic" tab:
- Protected System: The protected system you'd like to restore.
- Snapshot: The snapshot you'd like to restore from.
- Location: The location where the virtual machine will be created. This is either the local Slide Box or the Slide Cloud. If the snapshot is not available in both locations, you can only choose the location where the snapshot is available.
- Format: The format of the image export. See above for details on supported image file formats.
- NFS Sharing: If specified, allows the exported images to be accessed over NFS version 4.0+. This option is only available on a local Slide Box.
And a list of all settings in the "Advanced" tab:
- Enable Administrator User: If enabled, allows the Windows Administrator user to log into the Windows VM in addition to the existing Windows users. This option is helpful if login is not working properly, e.g. due to issues with Windows Hello.
After you've filled out the form, click the "Create" button to start the image export. Once the image export is complete, you'll be redirected to the Restores page with a sidebar showing the details about the image export:
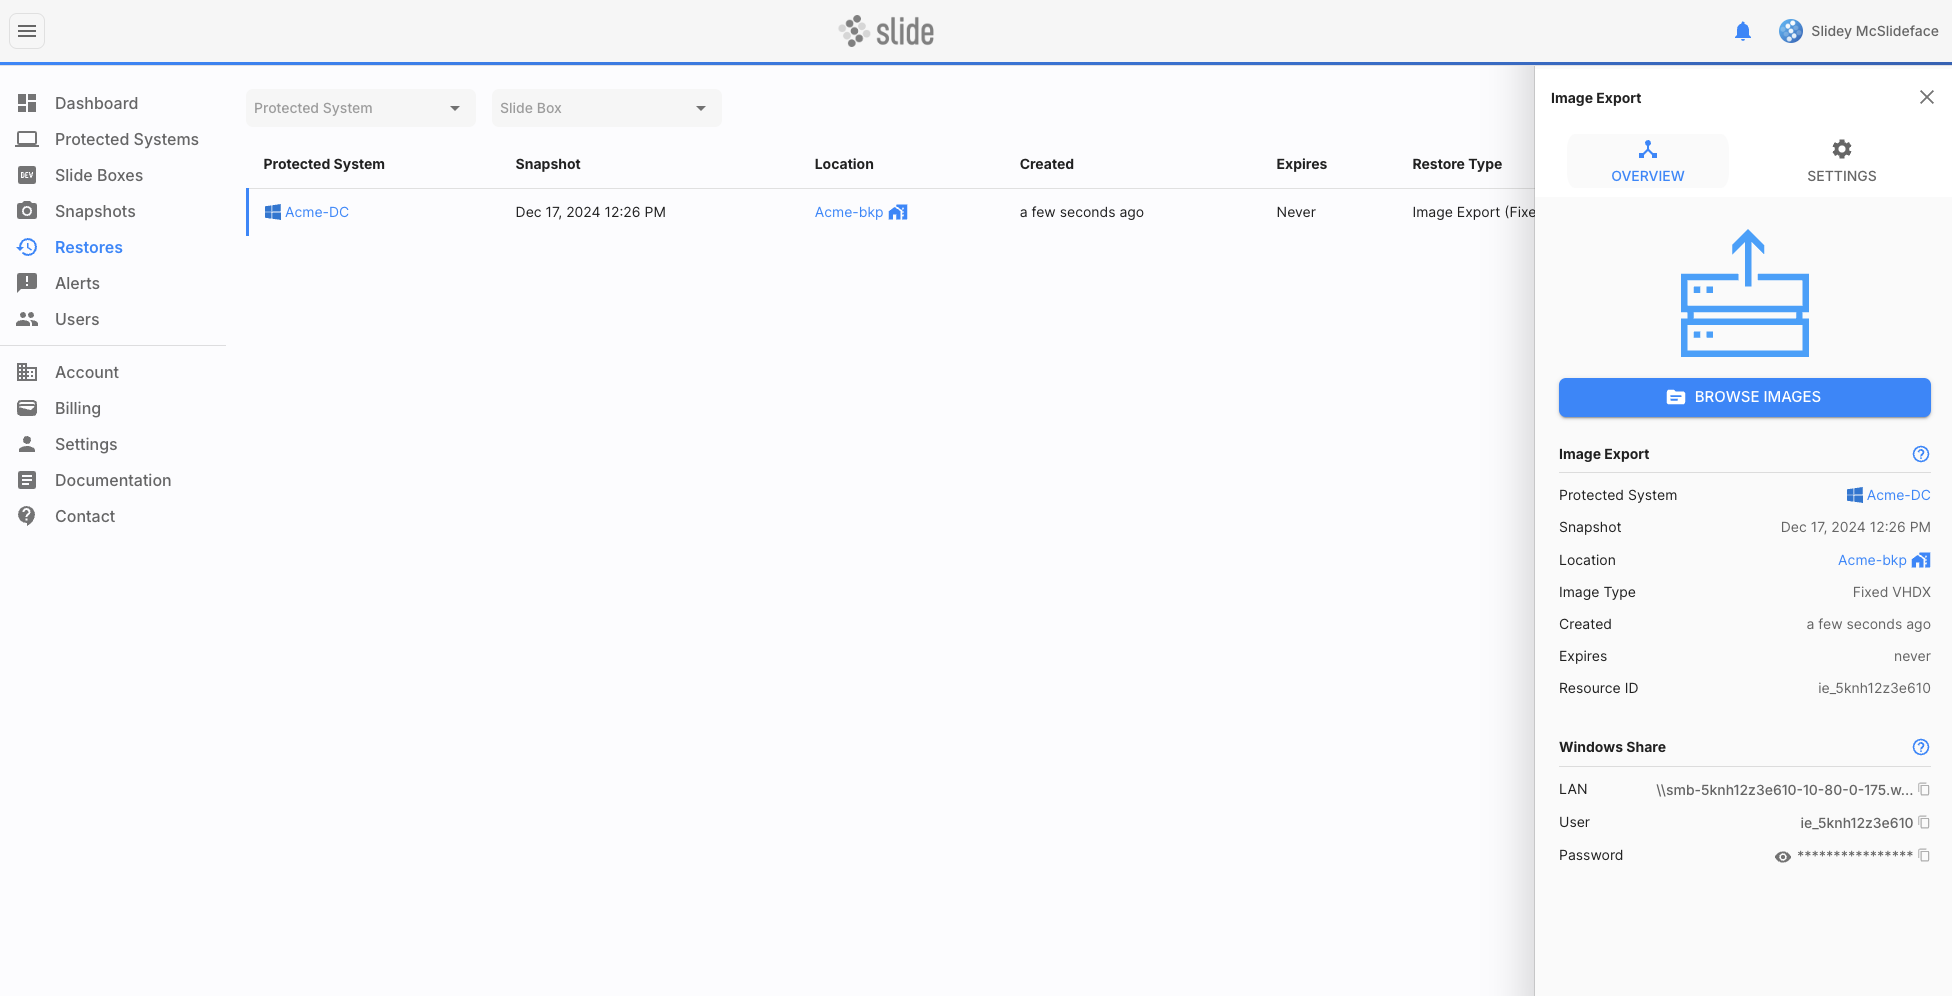
The sidebar shows you links to the disk image files (VHD, VHDX, VMDK, raw) that were created during the export. For local image exports (Slide Box), you can download the images either via LAN or through the Cloud Proxy. For cloud image exports, you can only download the images directly from the Slide Cloud.
If you are in the same network as the Slide Box, downloading the image files via LAN is the fastest option, as it doesn't route the download through the Cloud Proxy.
Info
The links contain an auth token, so you don't need to log in to download the image files. This is useful, so you don't need to share your Slide credentials with others who need to download the image files.
Restoring to Hyper-V
To create a new Virtual Machine in Hyper-V, you can use either VHD or VHDX image files. VHDX is the recommended and newer format.
After exporting the image in the Slide Console, first download the image file to your Hyper-V host using one of the links in the image export sidebar:
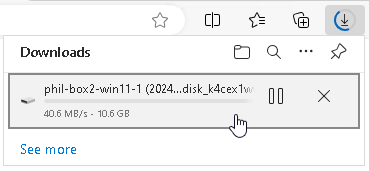
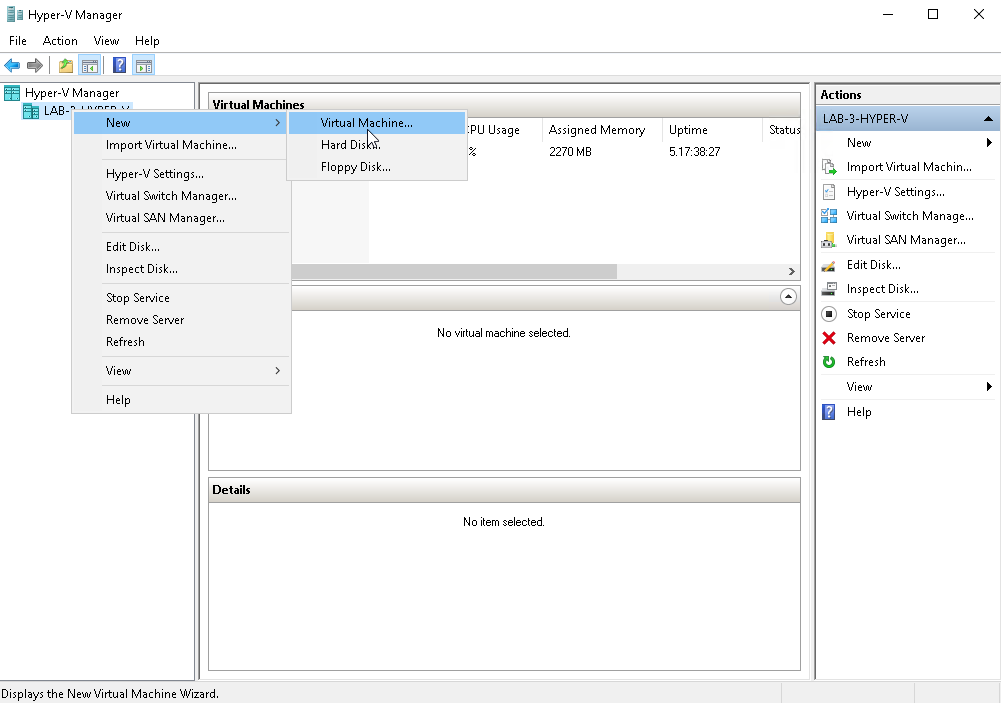
After you've downloaded the disk images, you can create a new Virtual Machine in Hyper-V and attach the disk image to it. To do this, open the Hyper-V Manager, right-click on your Hyper-V host, and select "New" -> "Virtual Machine". This will open the New Virtual Machine Wizard:
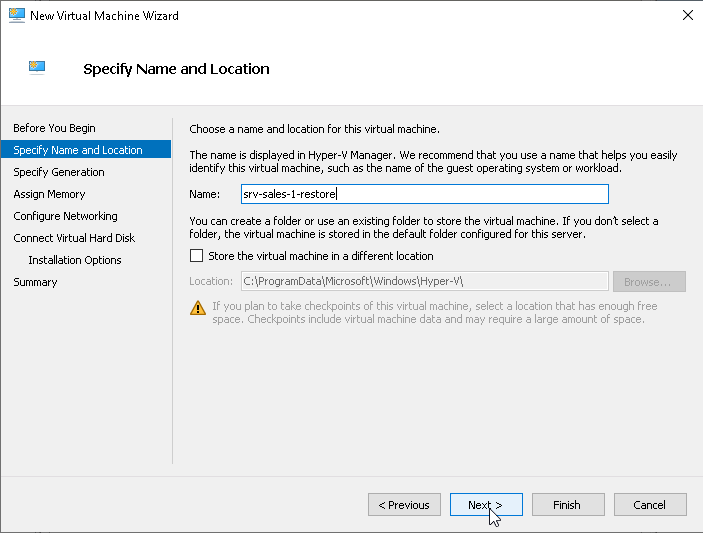
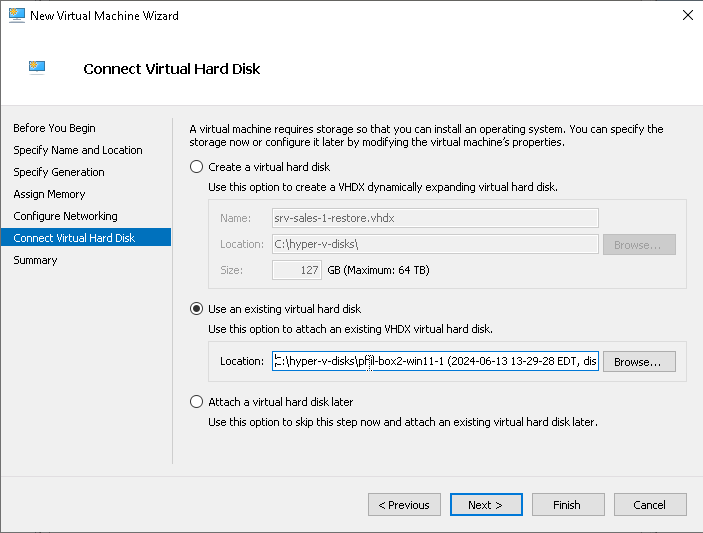
Walk through the wizard, selecting the options that fit your environment. When you get to the "Connect Virtual Hard Disk" step, select "Use an existing virtual hard disk" and browse to the downloaded VHDX file(s):
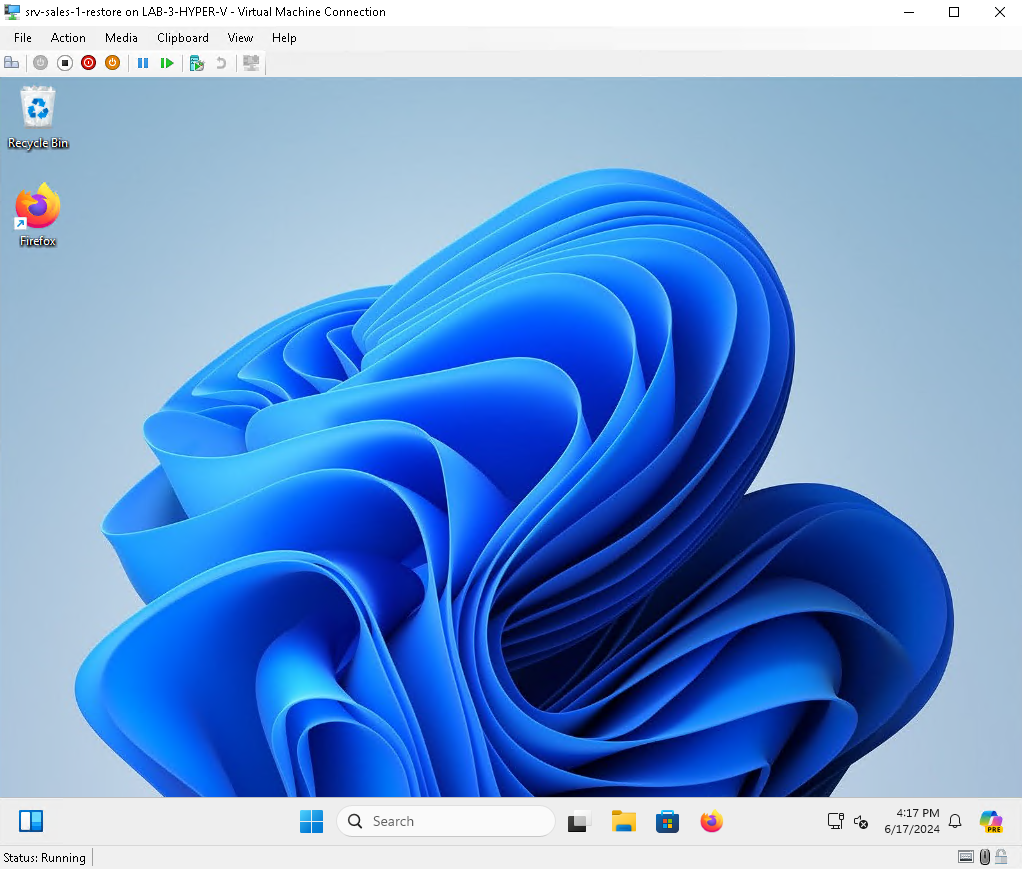
After you've attached the disk image, you can finish the wizard and start the Virtual Machine. The Virtual Machine will boot from the disk image, and you'll be able to interact with it as if it were a physical machine.
For Hyper-V Restores, you have the ability to choose between Gen 1 and Gen 2 systems when creating a virtual machine template. Depending on your system configurations you may need to select the correct generation or your system may not boot. This is especially true with systems running older bootloaders (BIOS). More information on Microsoft's website here.
Restoring to VMware vSphere
To create a new Virtual Machine in VMware vSphere, use Flat VMDK image files and add an NFS Client with the IP range containing your hypervisor.
Info
Restoring over NFS is recommended, since VMDKs can be copied directly from the Slide Box to the datastore in one step and the resulting files will be thin provisioned.
After exporting the image in the Slide Console, mount the NFS datastore on your hypervisor.
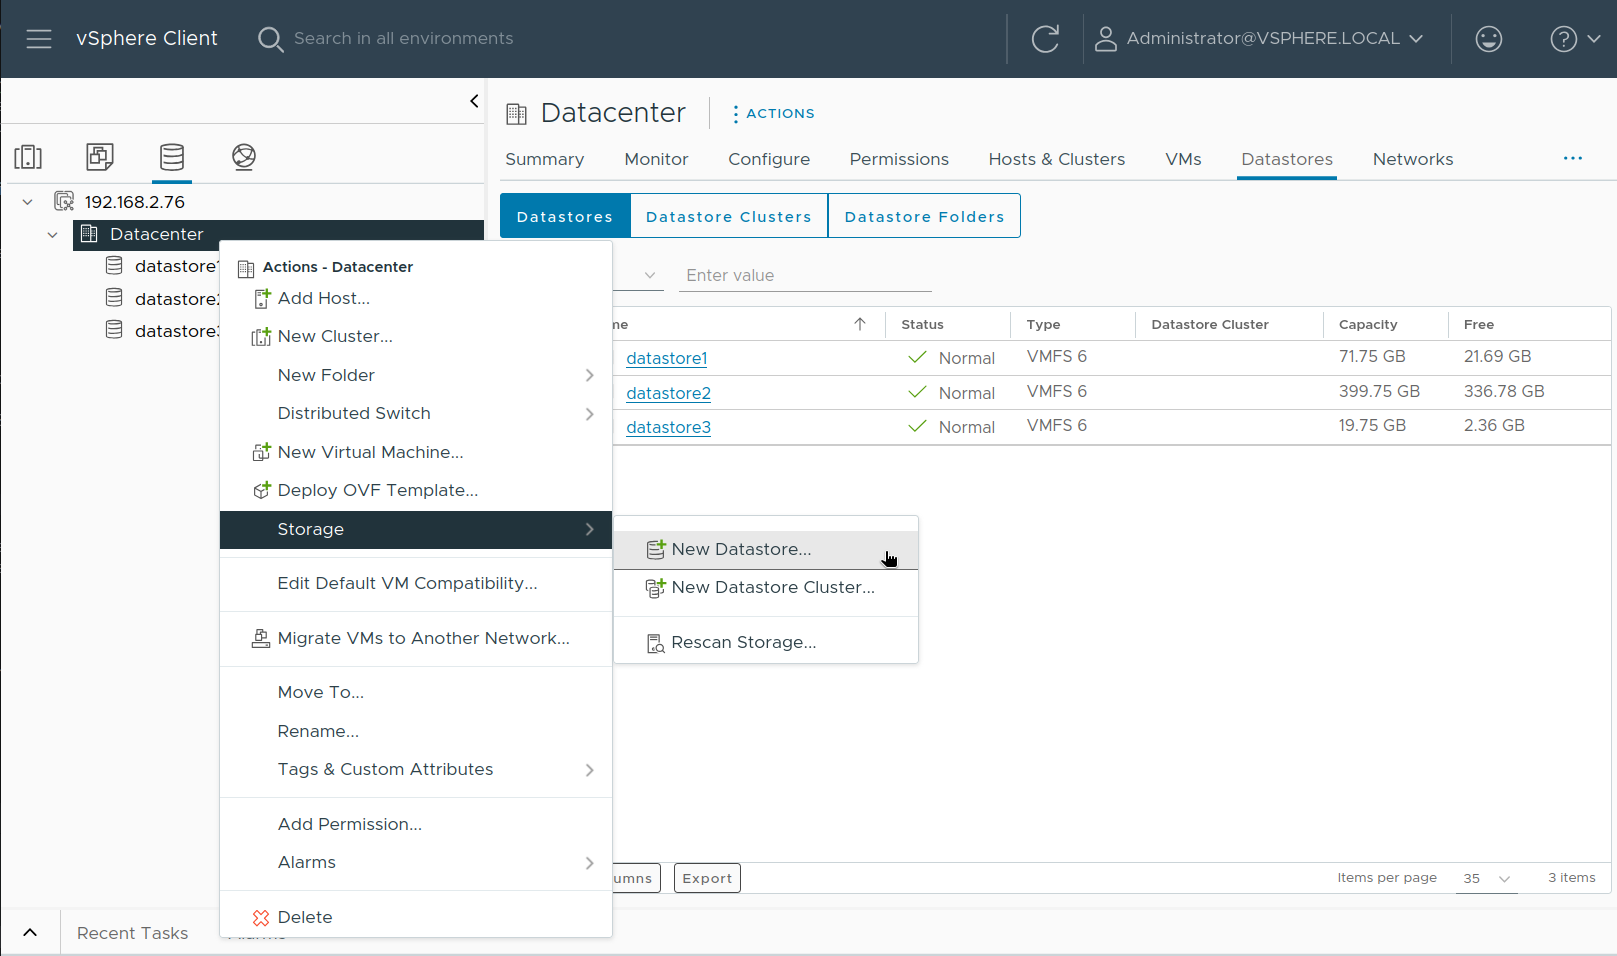
To do this, open the vSphere client, right-click on your Datacenter and select "Storage" -> "New Datastore".
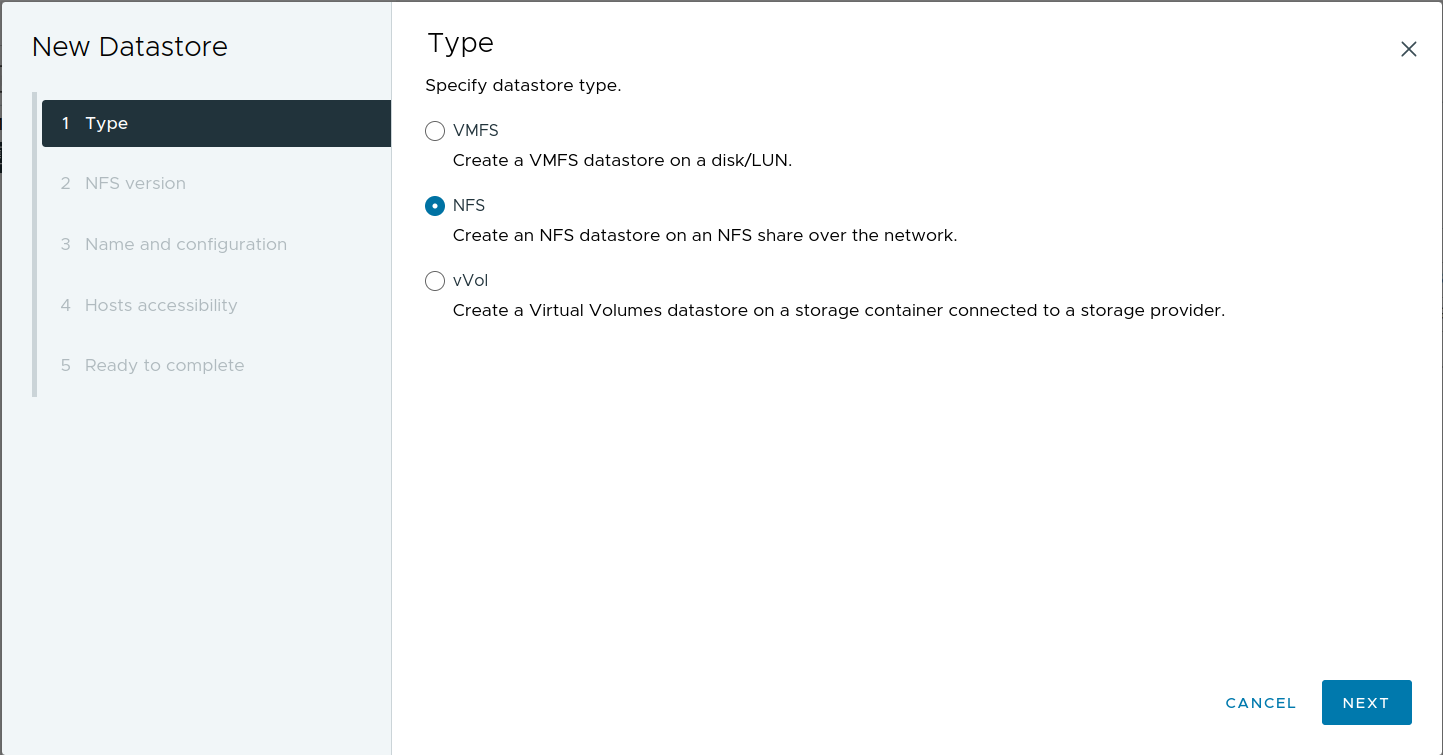
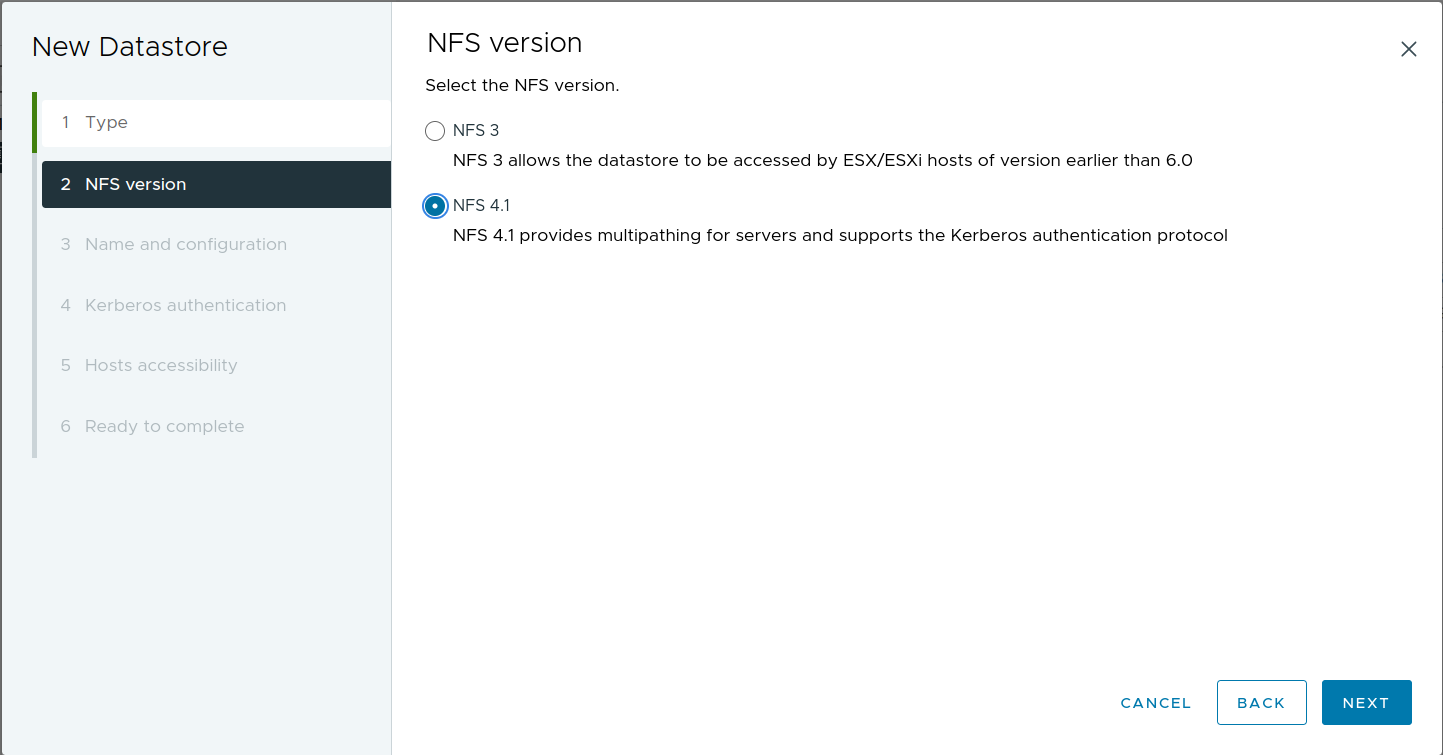
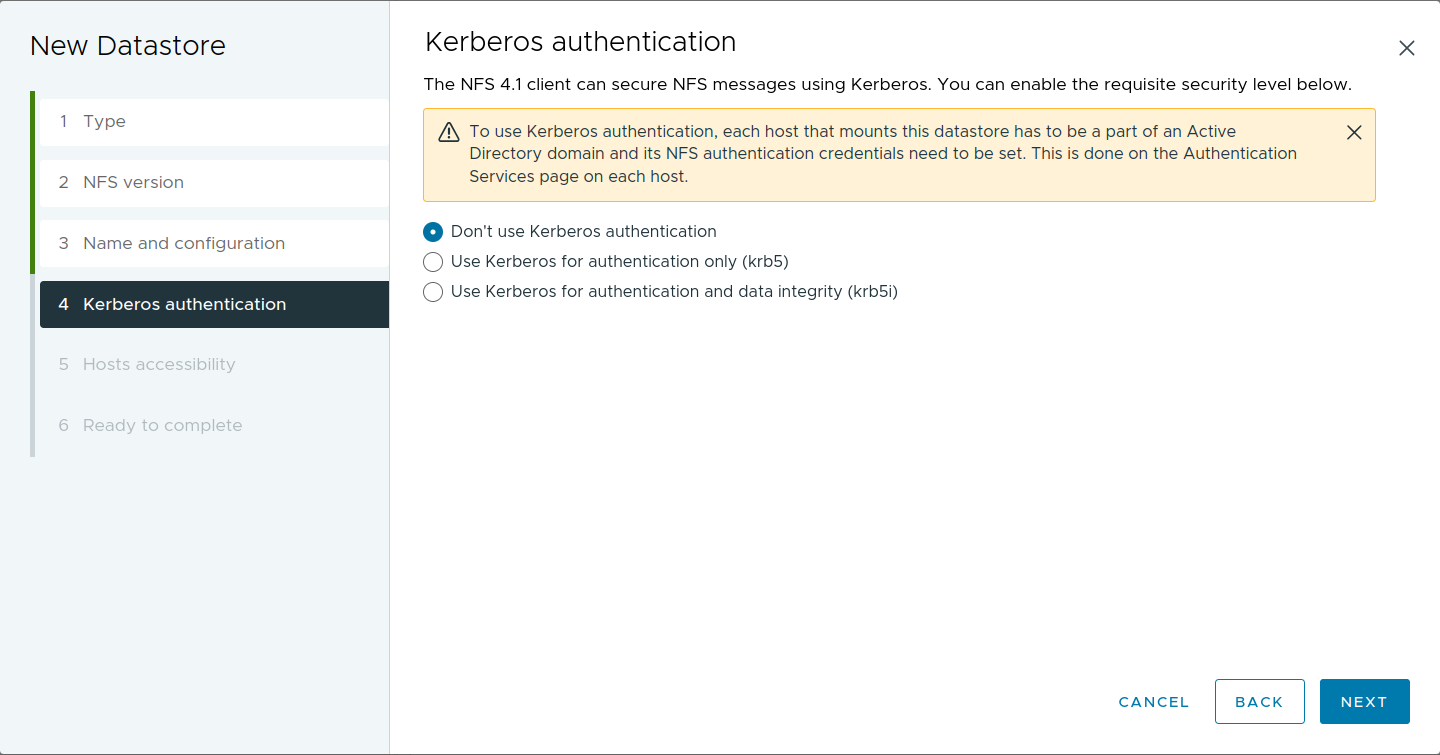
Walk through the wizard, select NFS version 4.1, add the Folder and Server from the NFS share details shown in the Slide image export sidebar, and leave Kerberos authentication off.

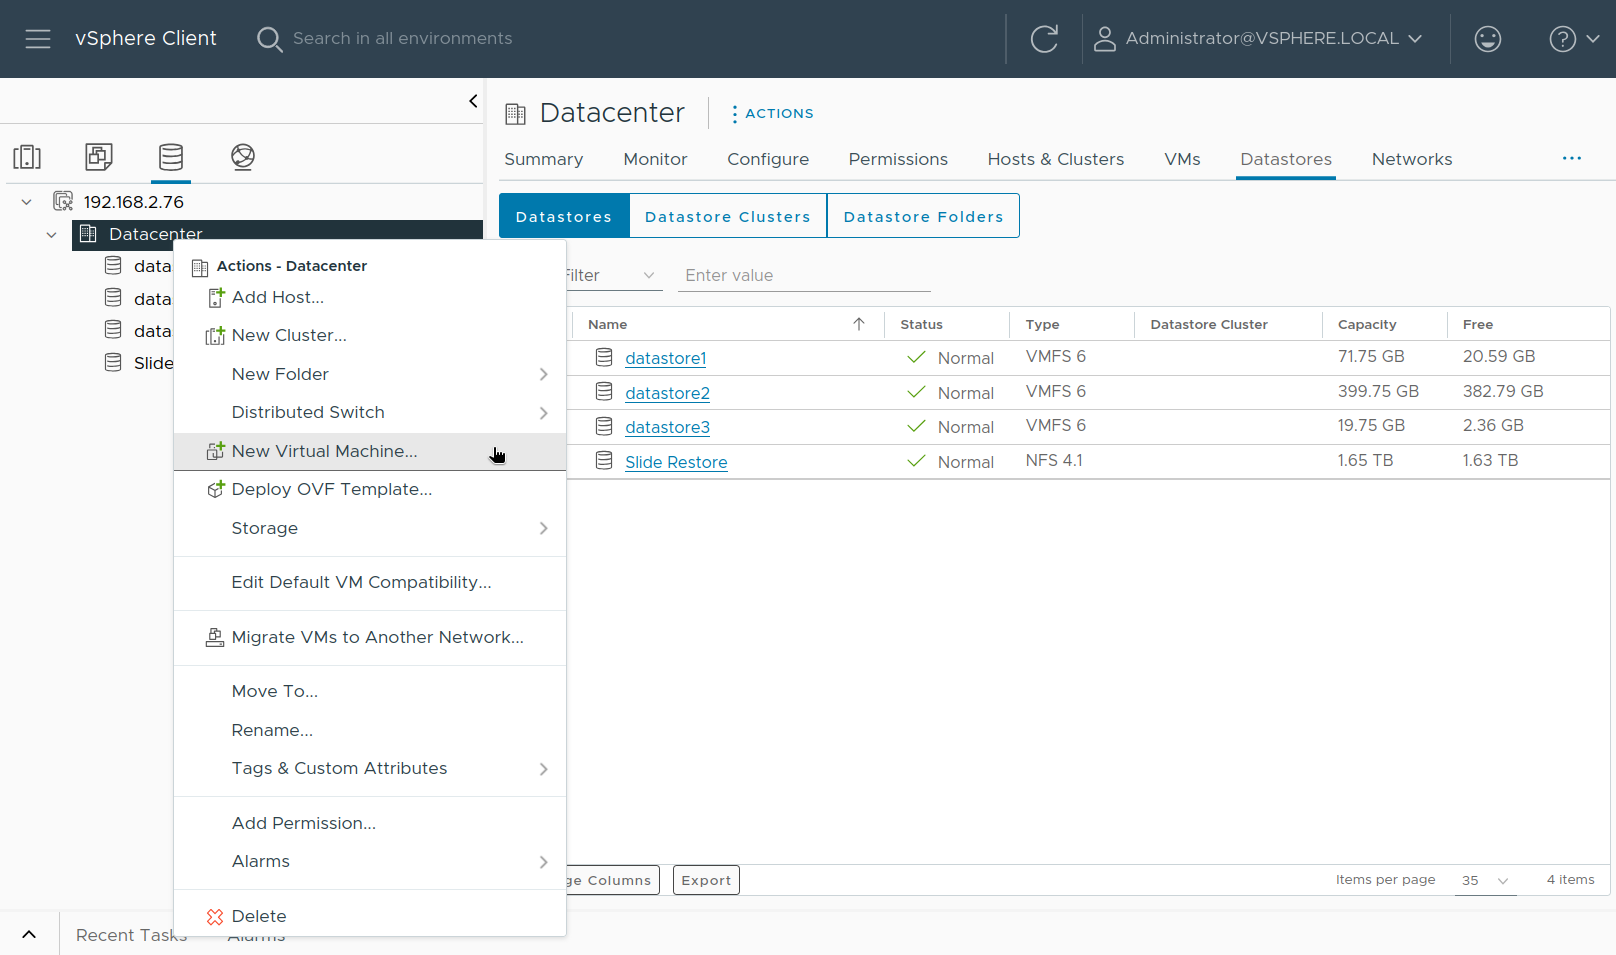
Right-click on your Datacenter and select "New Virtual Machine".
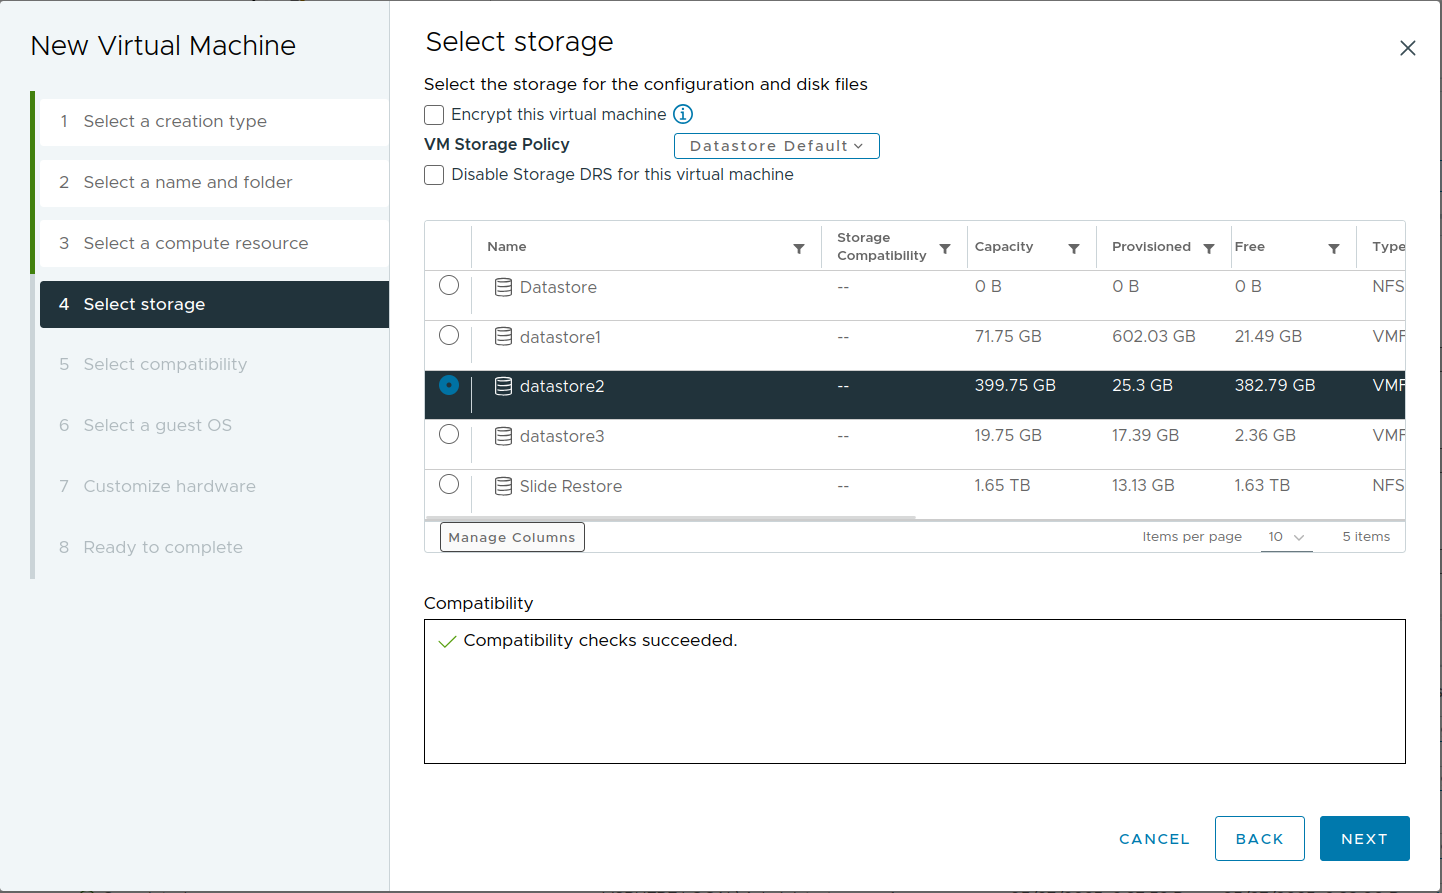
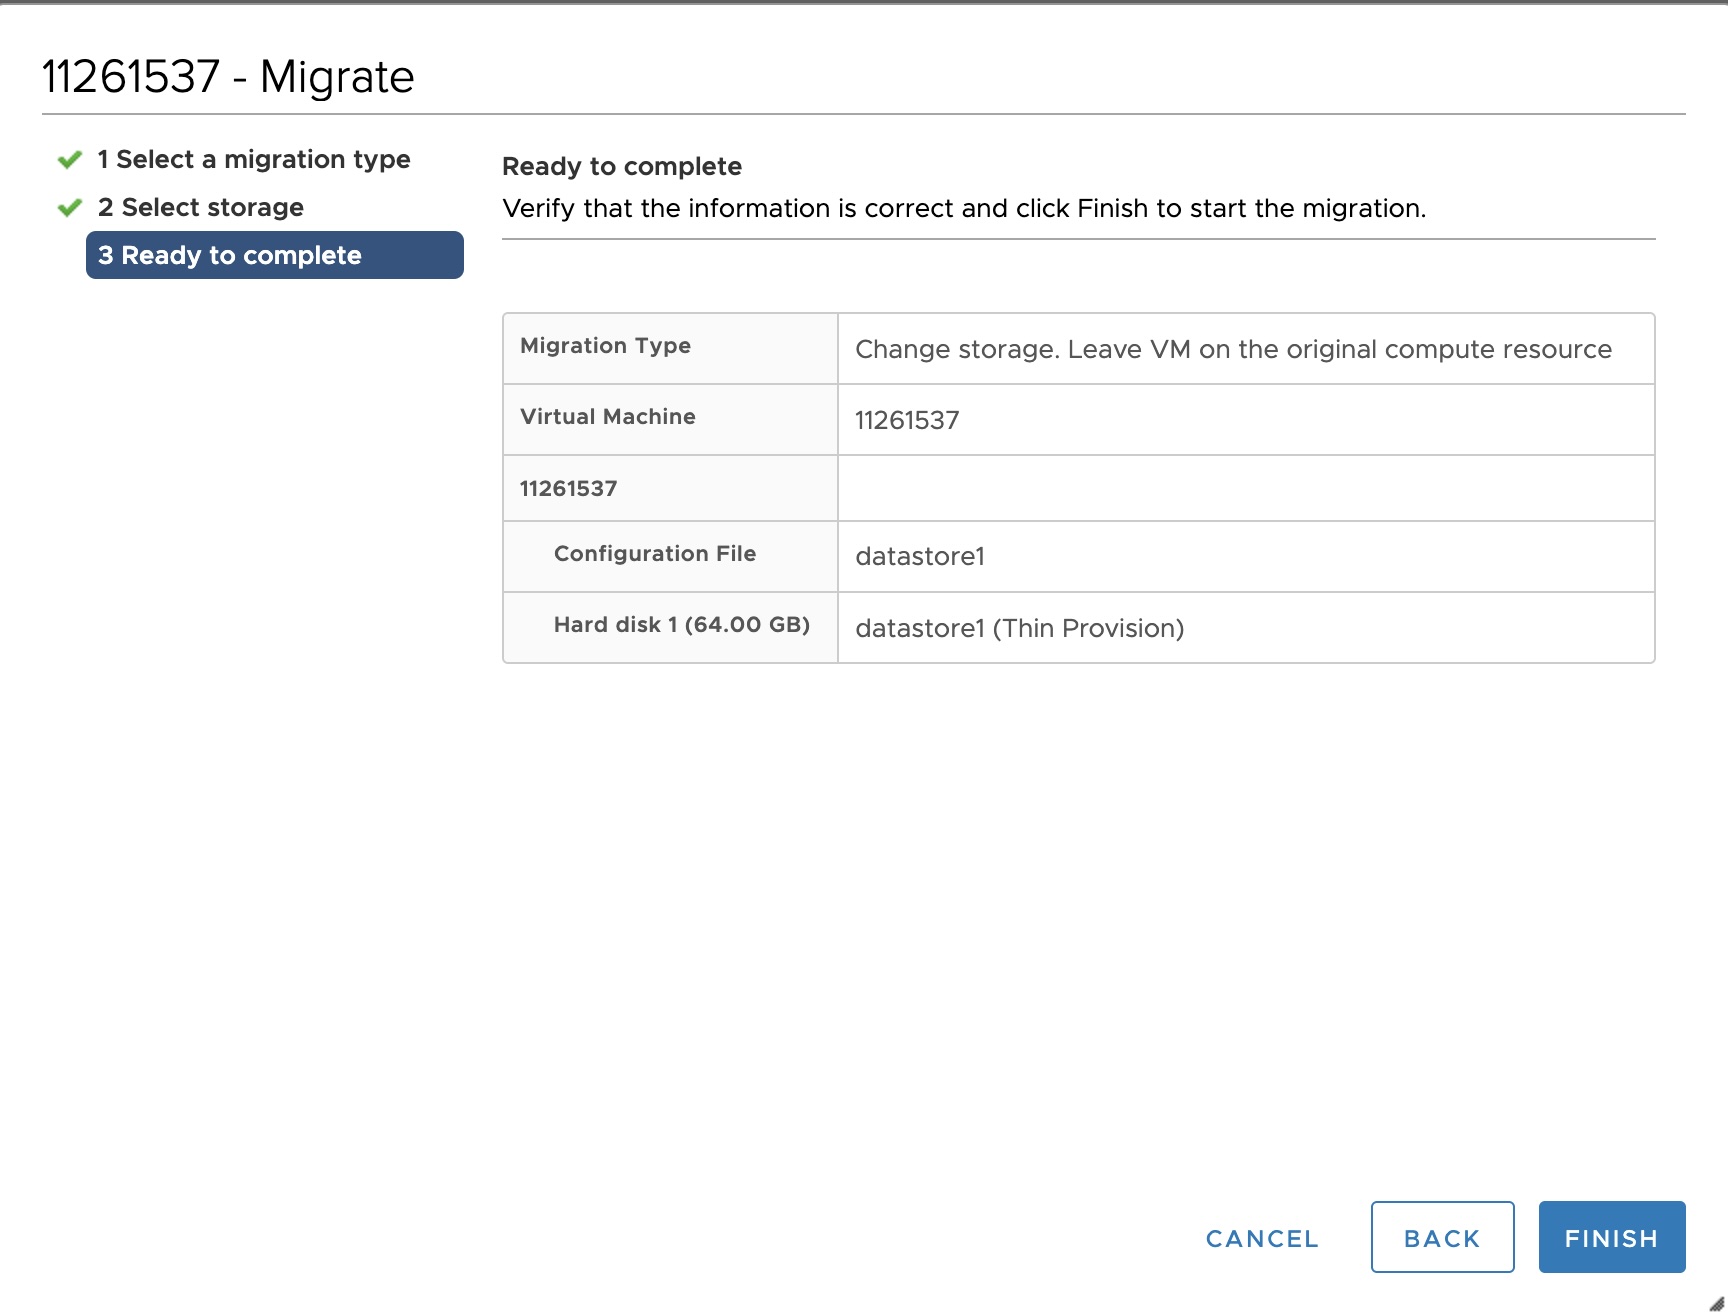
Walk through the wizard, selecting the options that fit your environment. When you get to the "Select storage" step, choose an appropriate datastore to house your VM, do not select the datastore you created for the NFS connection to your Slide Box (the Slide Box will only host your disk files).
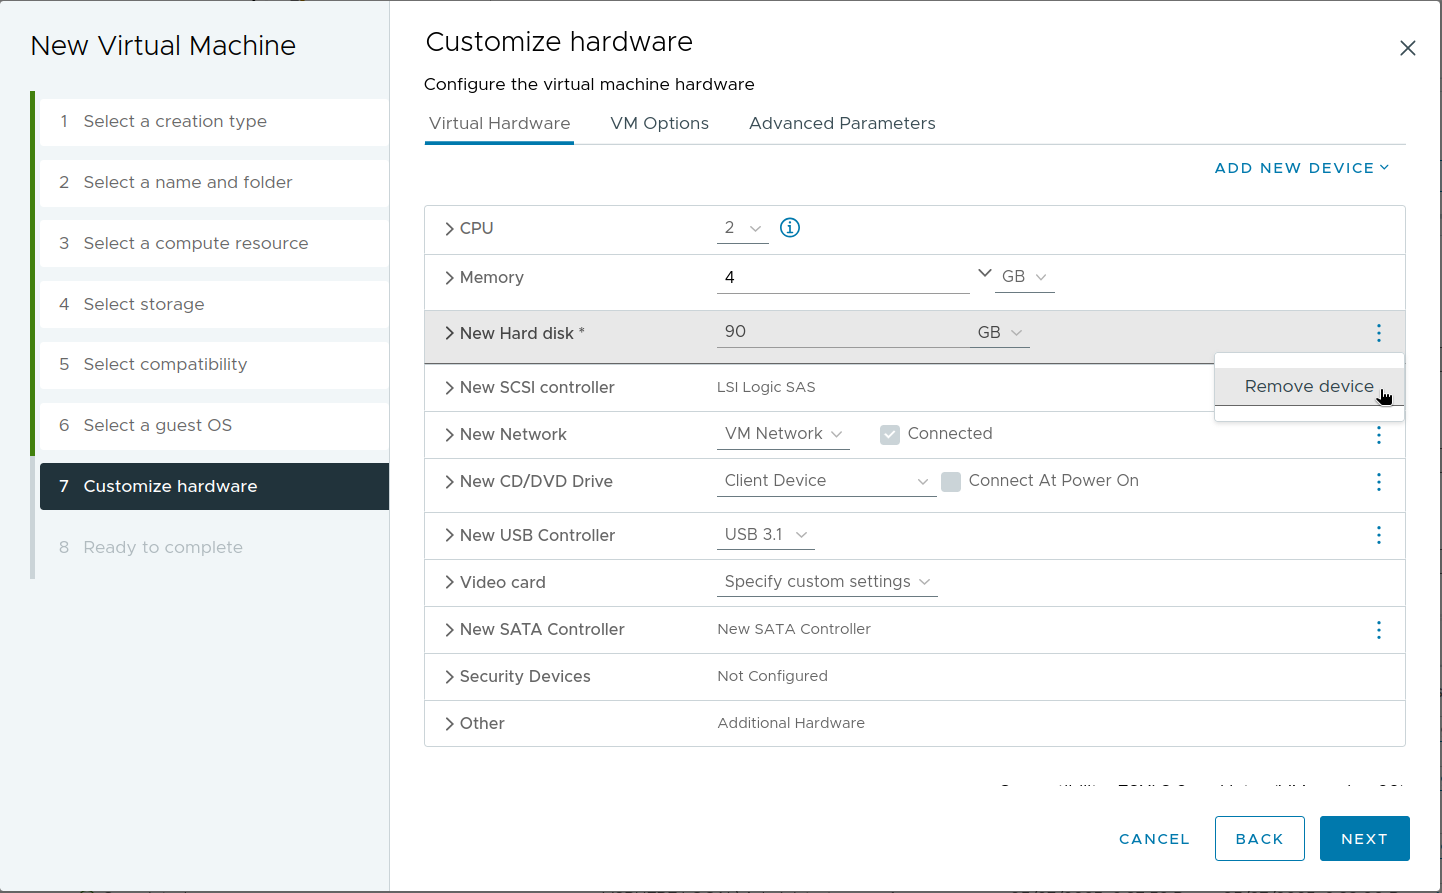
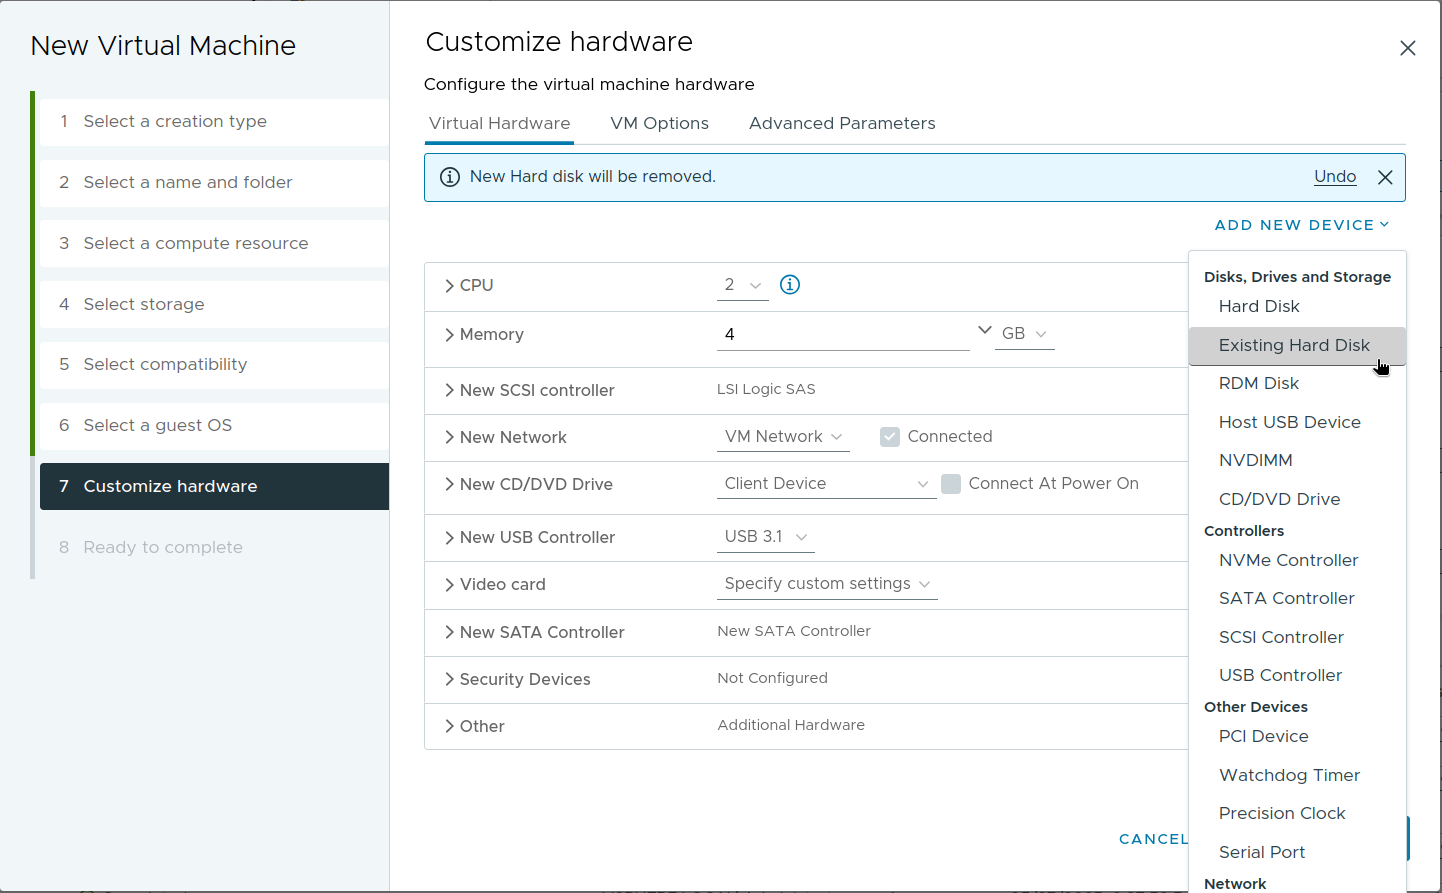
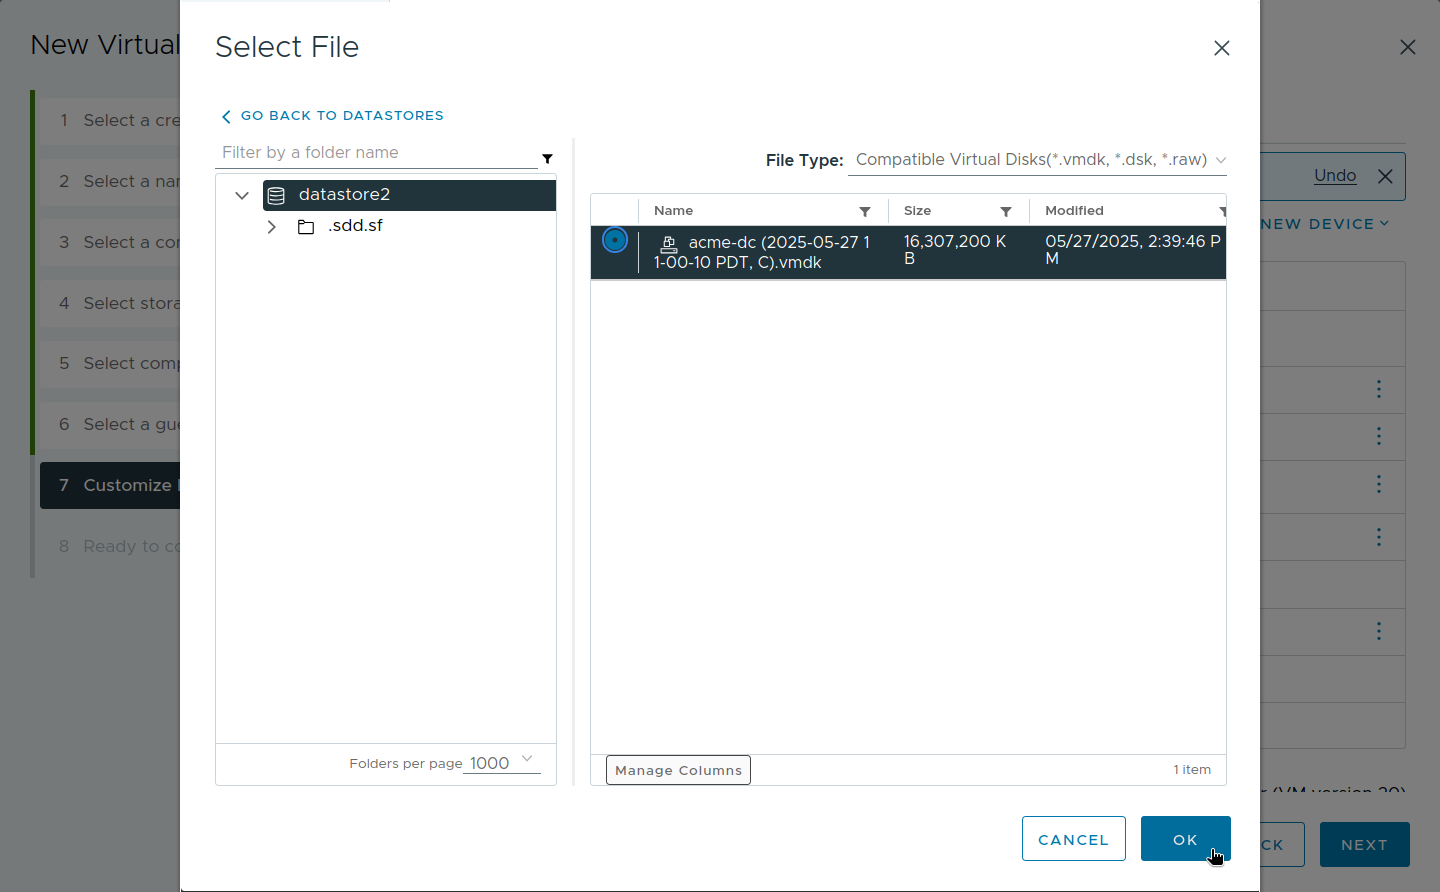
Continue to the "Customize hardware" step, then remove the "New Hard Disk" since it is not needed. Add your VMDK disk(s) by selecting "ADD NEW DEVICE" -> "Existing Hard Disk", then selecting the VMDK file from your NFS datastore.
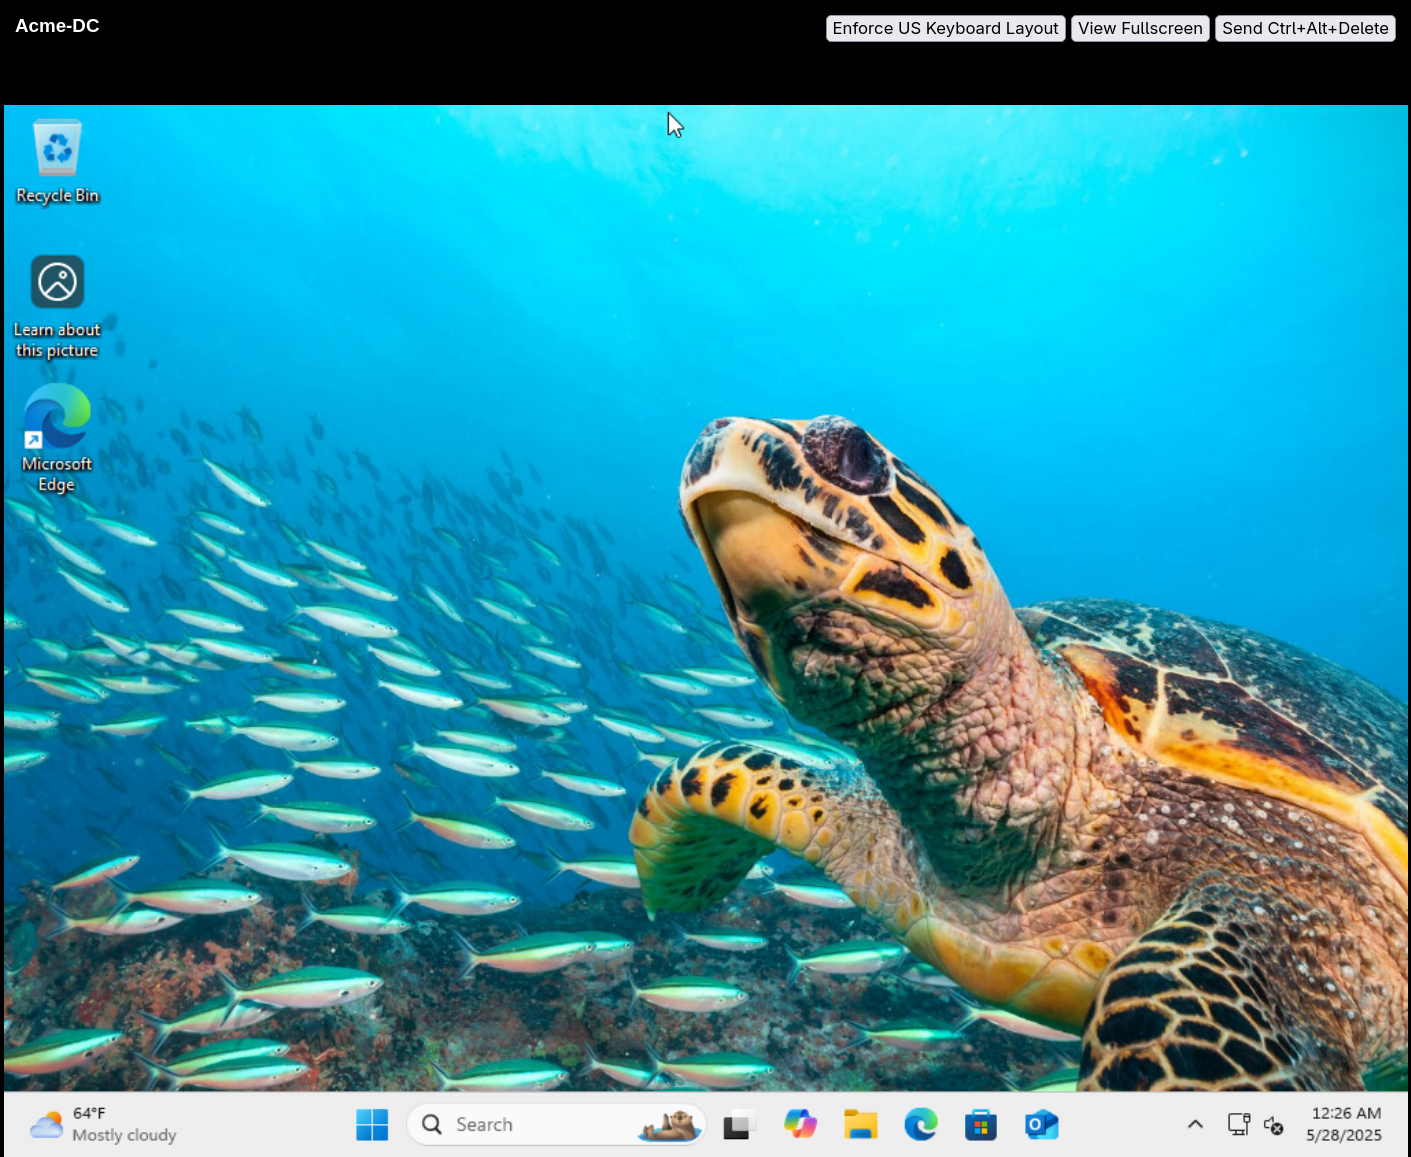
After you've attached the disk image, you can finish the wizard and start the Virtual Machine. The Virtual Machine will boot from the disk image, and you'll be able to interact with it as if it were a physical machine.
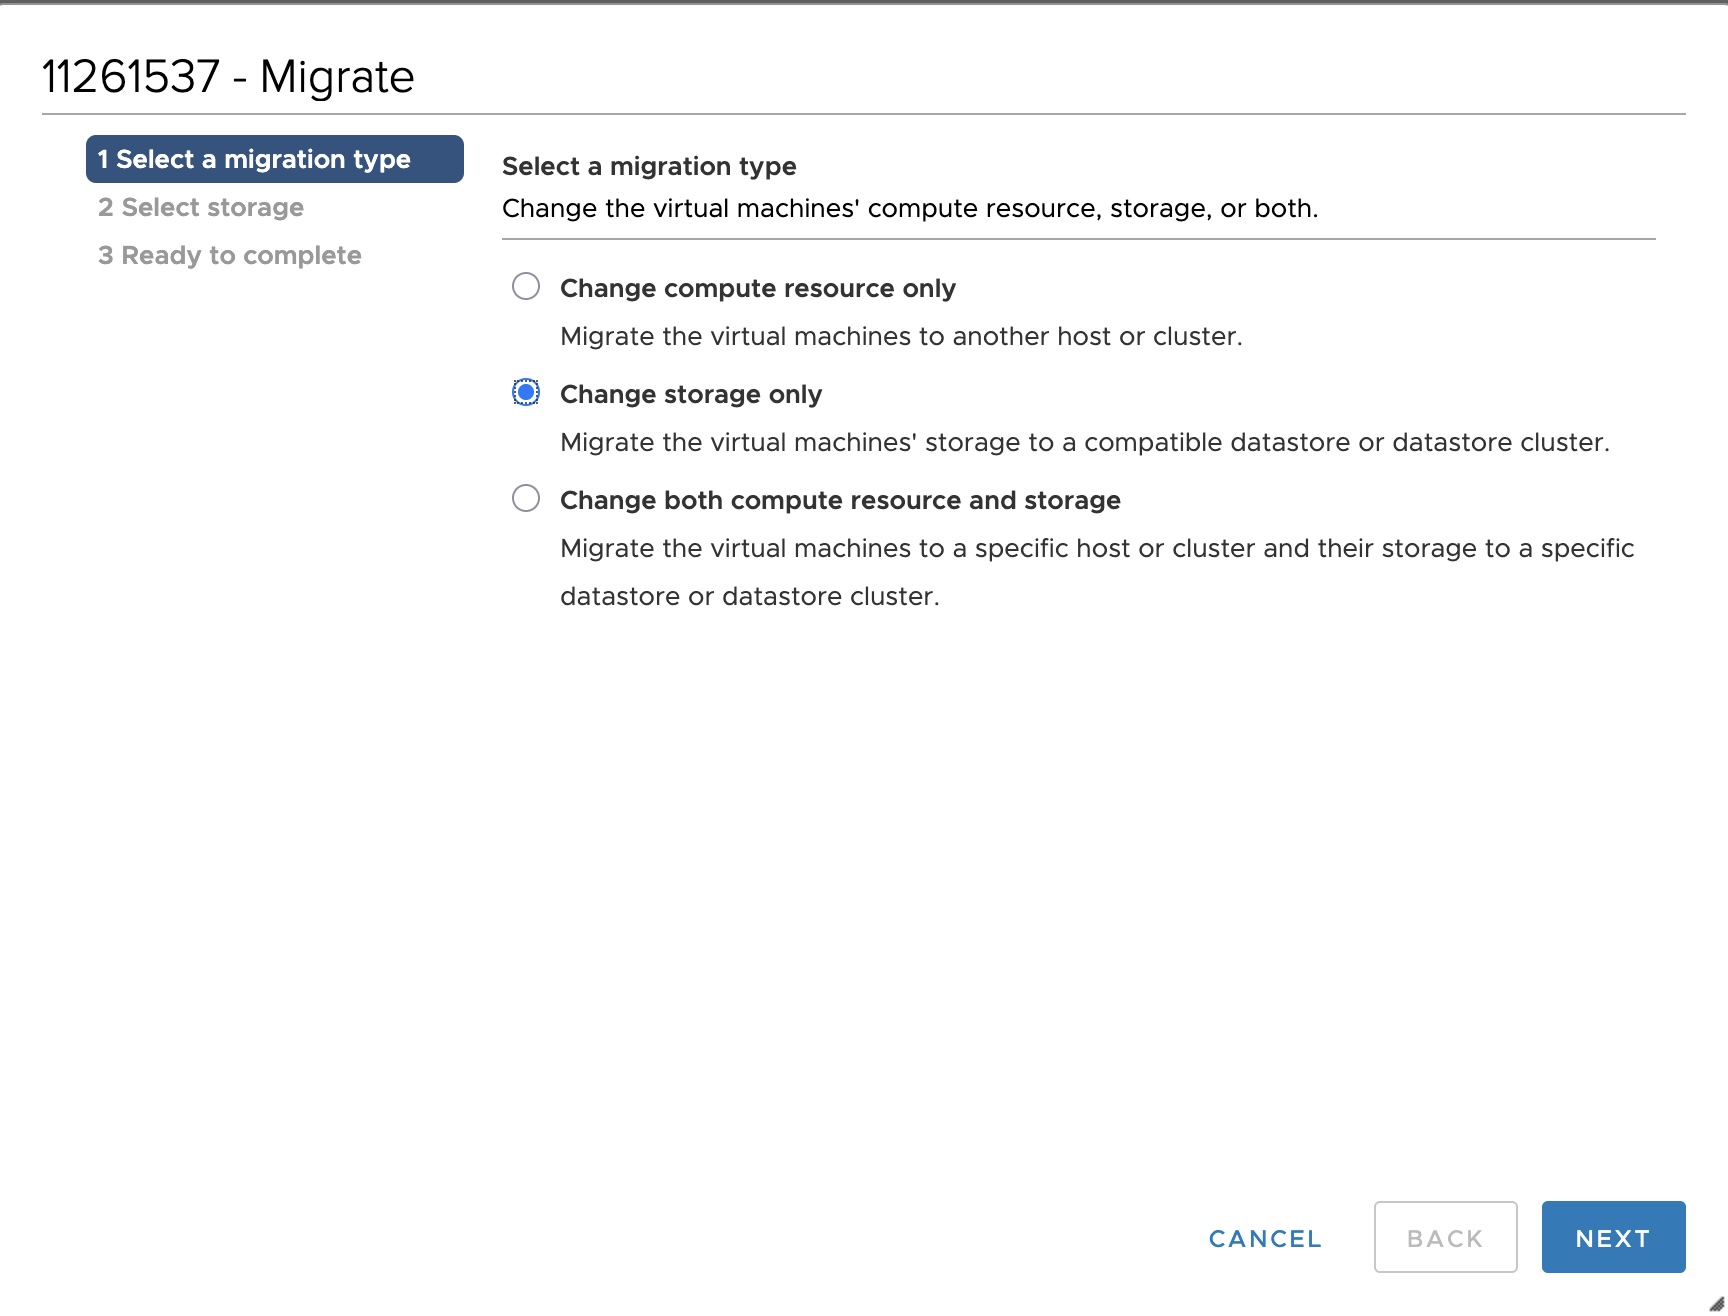
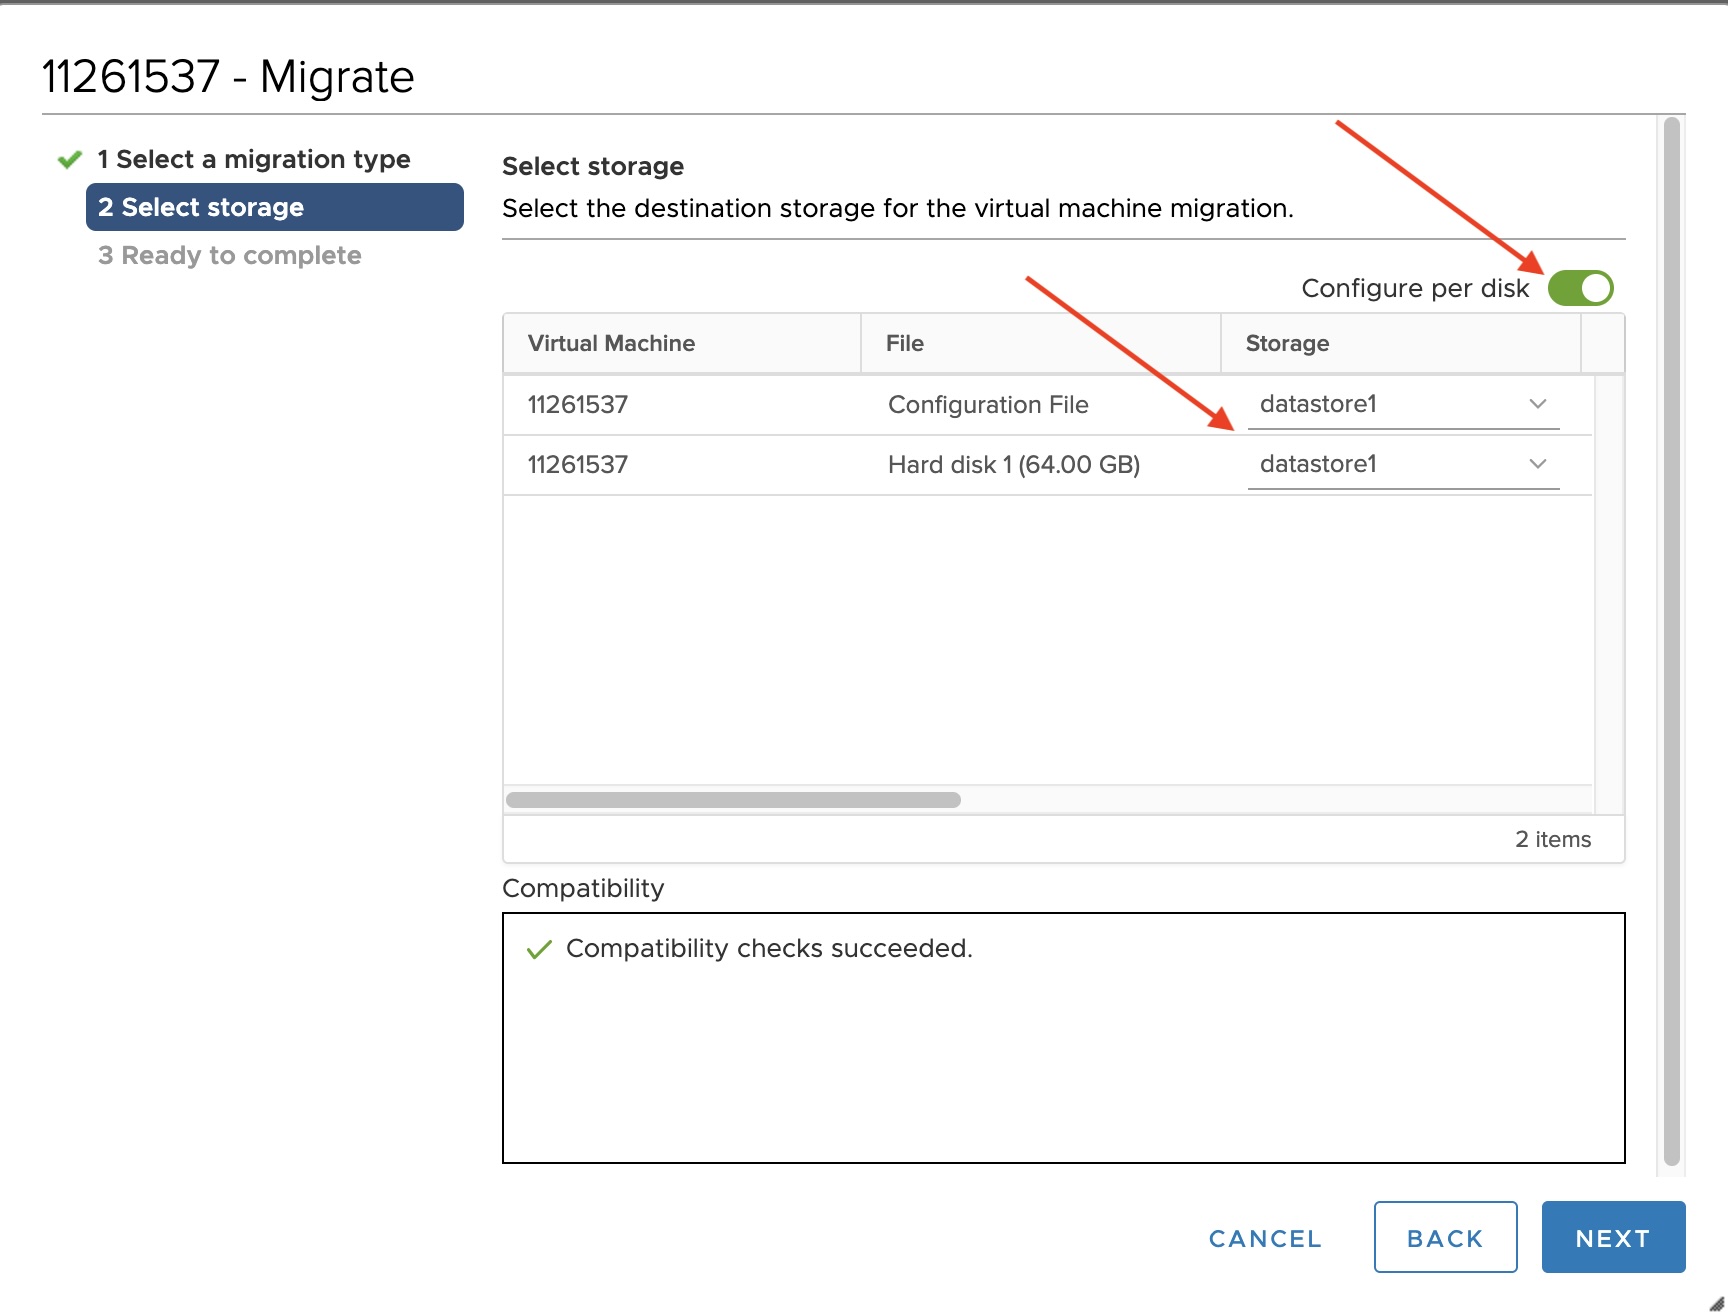
When it's safe to do so, migrate your hard disk(s) out of the NFS datastore and into your datastore.
Re-enabling the Slide Agent
The Slide Agent service is disabled in Image Exports. To re-enable the agent and continue backups:
- In the restored system, open Services.msc.
- Find the Slide Agent service, right-click it, and open Properties.
- Change Startup Type from Disabled to Automatic and click Apply.
- Click Start and verify the service status changes to Running.
Bare Metal Restore from an Image Export - BMR
Slide does not offer its own Bare Metal Restore (BMR) tool yet. In the meantime, Image Export files are able to be restored to physical hardware via 3rd party imaging tools that support VHD, VHDX, or raw disk image files. In this example we will use two open source tools:
- Rescuezilla - a user-friendly version of the Clonezilla disk imaging tool.
- Etcher - to burn Rescuezilla to a USB drive.
Preparation:
- Install Etcher and use it to burn the Rescuezilla ISO to a USB drive.
- Perform an Image Export.
Info
A Dynamic VHDX image will be as large as your snapshot's used space, and is the recommended format for this scenario. VHD, fixed VHDX, and raw image files will be as large as your snapshot's total volume size.
Steps:
- Plug the Rescuezilla USB into your target system, and boot into Rescuezilla. You may need to select the "Graphical fallback" option if booting fails.
- Select Restore.
- If you have your restore images in an attached drive, select "Connected directly to my computer". If you have the restore images in a share, or would like to restore directly from the Samba or NFS share on your Slide Box, select "Shared over a network", and enter your share's location, username, and password.
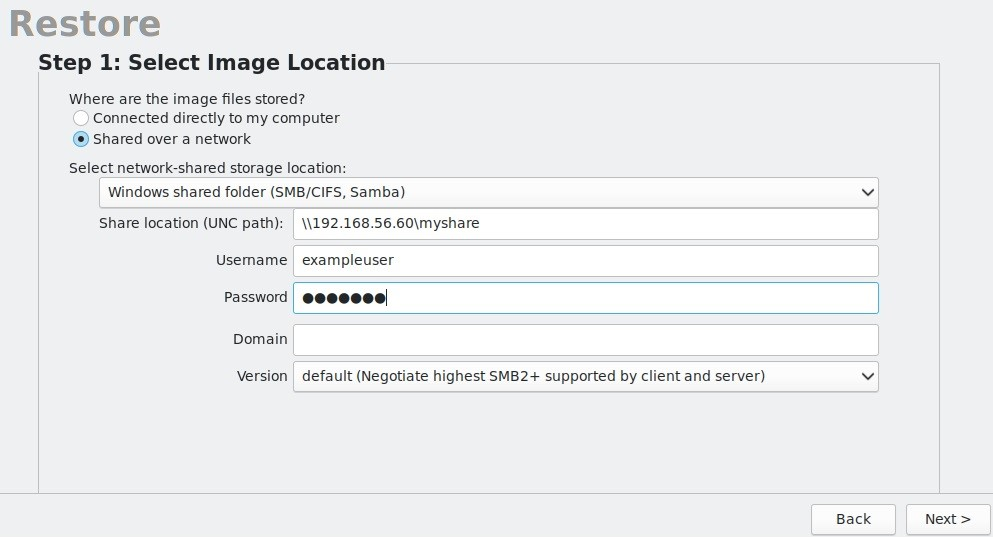
Selecting restore location in Rescuezilla - Select the image file containing your restore's OS drive.
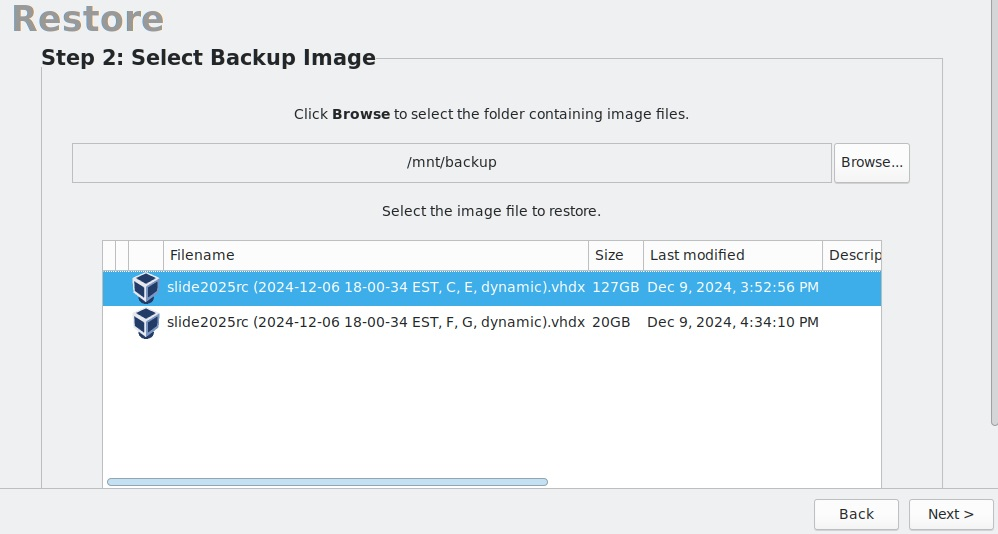
Selecting image file in Rescuezilla - Select the target system's drive to transfer the image to. You will overwrite any data on the drive you restore to, so be careful.
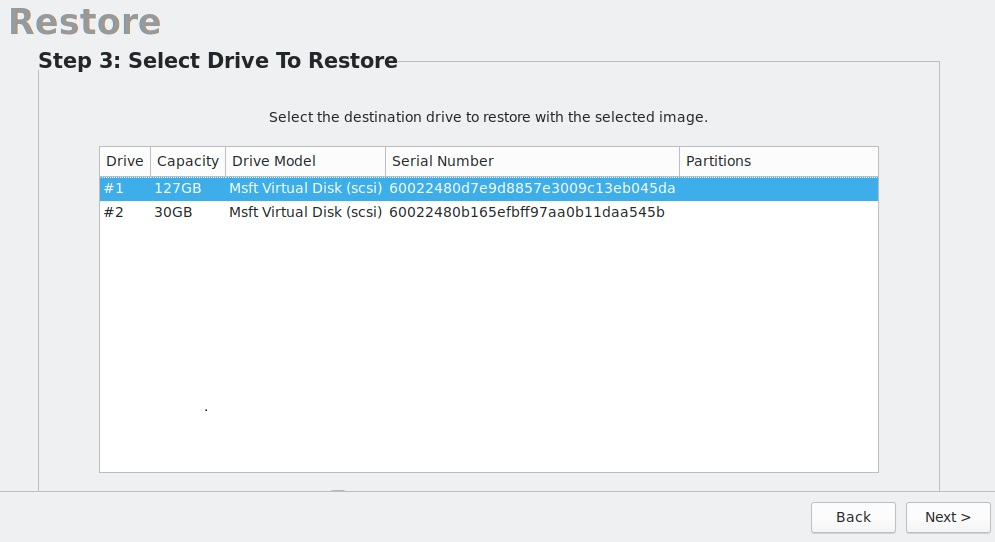
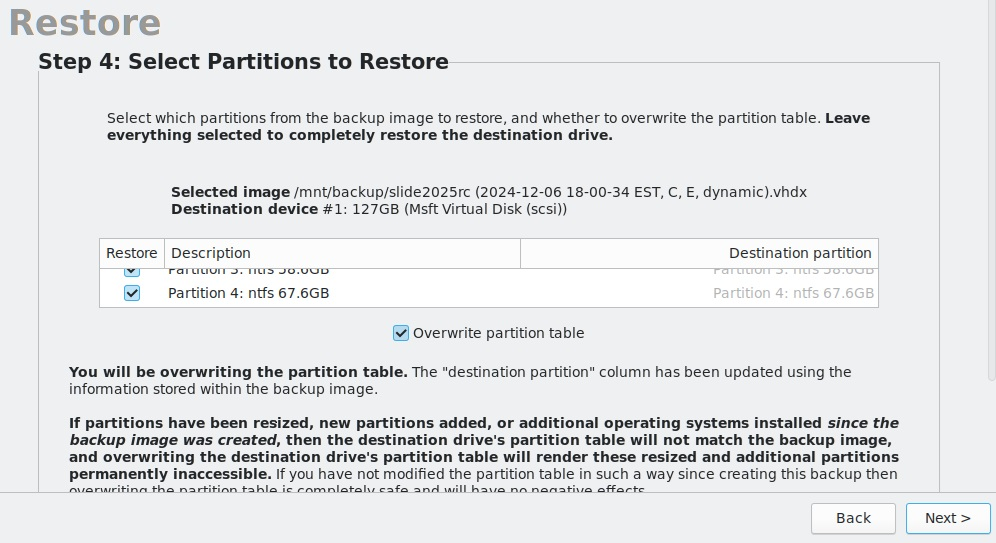
Selecting destination drive and restore partitions in Rescuezilla - Start the transfer.
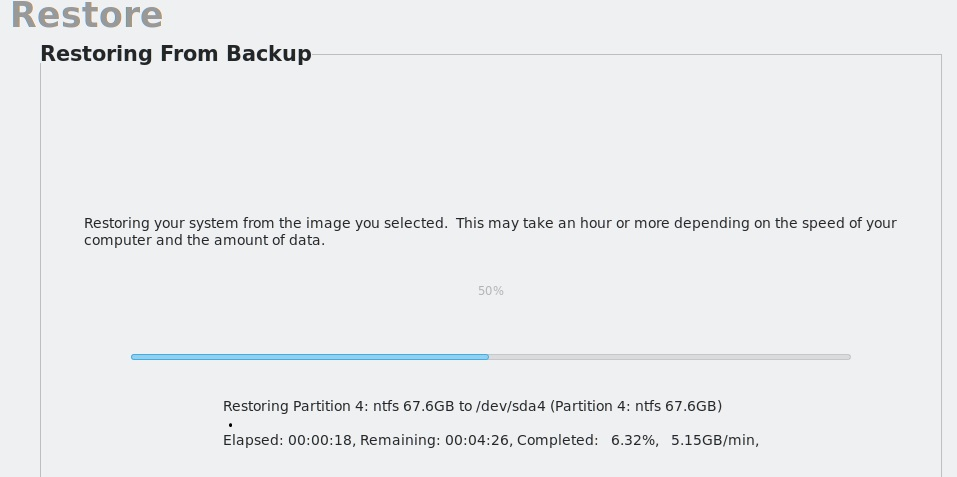
Transferring an image in Rescuezilla - After the process finishes, reboot, and verify you can login to the restored system.
- If you have additional volumes to restore, you can either use Rescuezilla again (by selecting a different image file and target drive), or else copy data via the restored system (e.g. by opening diskmgmt.msc, selecting "Action" then "Attach VHD", then copying from the restore volume to a new local volume).
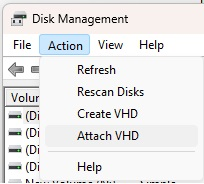
Attaching a VHD via Disk Management - If this is an actual recovery scenario (not a test), and you want to continue backups on the system you restored, you'll need to re-enable the Slide Agent.
Restore Expirations
| Restore Type | Default Automatic Shutdown | Default Expire Time | Maximum Extension |
|---|---|---|---|
| Test Virtual Machine | 10 days | 14 days | 3 weeks |
| Disaster Virtual Machine | 52 days | 56 days | 3 months |
| File Restore | - | 3 days | 1 week |
| Image Export | 10 days | 14 days | 3 weeks |